
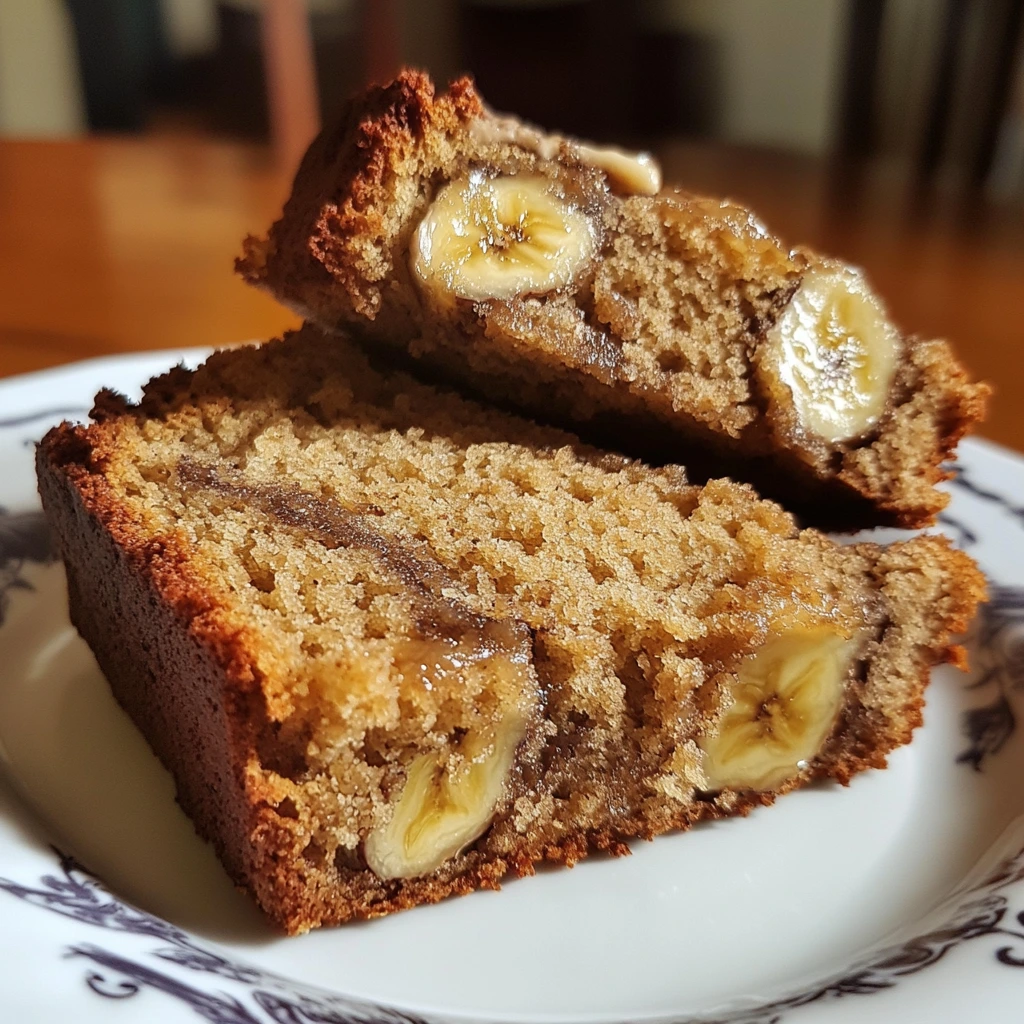
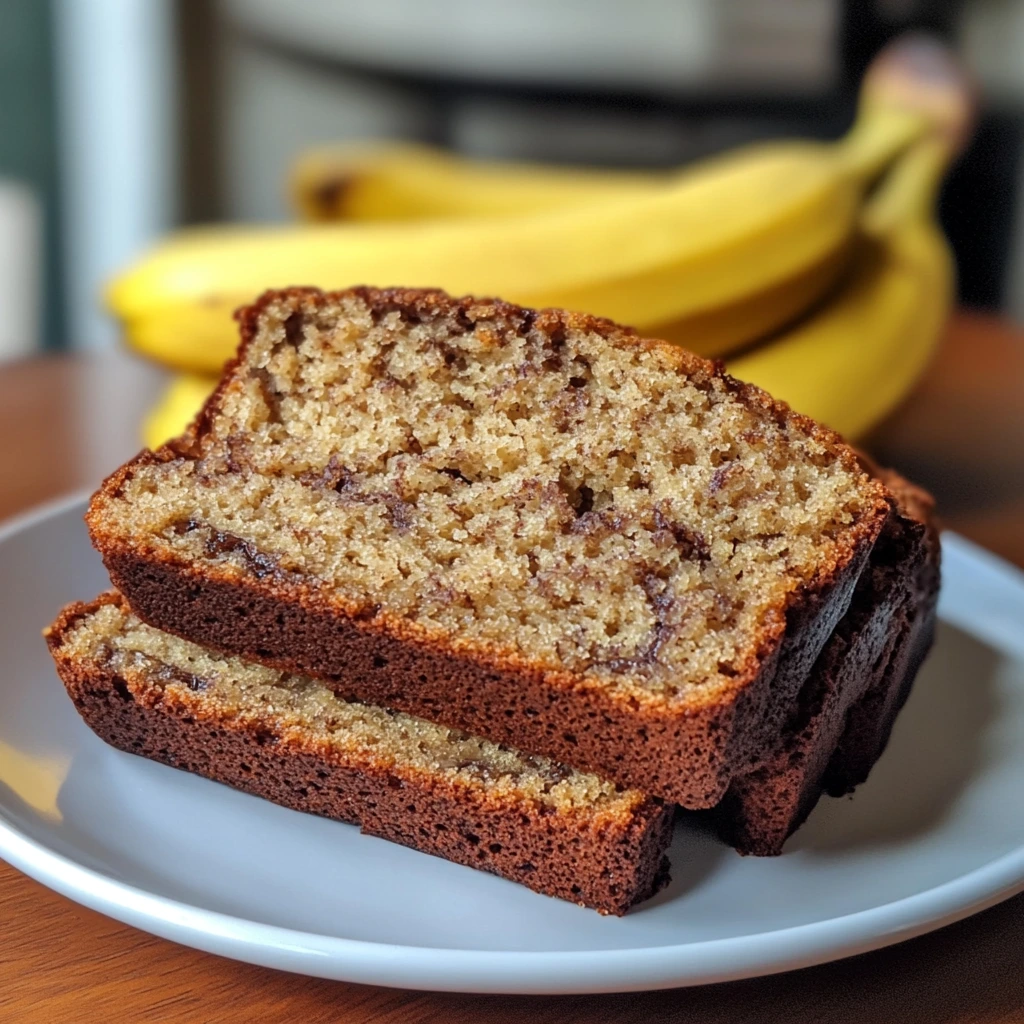
Got two ripe bananas sitting on your counter? Don’t let them go to waste! This easy 2 banana bread recipe is the perfect way to turn them into a moist, fluffy, and delicious homemade treat. Whether you’re craving a quick snack, a cozy breakfast, or a sweet dessert, this small batch banana bread is simple to make with basic pantry ingredients.
With just flour, eggs, butter, sugar, and a few baking essentials, you can have a warm, freshly baked loaf ready in under an hour. Plus, this recipe is beginner-friendly, requiring no fancy mixers or complicated steps.
Keep reading to learn how to make banana bread with just 2 bananas, plus pro tips to keep it extra soft and flavorful. Let’s get baking! 🍌🍞
Table of Contents
Why You’ll Love This 2 Banana Bread Recipe
Perfect for Using Up Overripe Bananas
One of the best reasons to make this 2 banana bread recipe is that it’s the perfect way to use up overripe bananas that are starting to turn brown. Bananas that have ripened past the point of eating are actually ideal for banana bread because their sweetness and flavor are at their peak. As bananas ripen, the starches break down into natural sugars, which means they’ll create a sweeter, richer taste in your bread.
Using overripe bananas also helps keep your banana bread moist. The natural moisture from the bananas adds to the overall texture, ensuring that your loaf comes out tender and soft every time. Plus, overripe bananas are often easier to mash, which helps them blend seamlessly into the batter, giving your banana bread a smooth consistency without any chunks of banana.
If you find that you have several overripe bananas sitting on your counter, making banana bread is a quick and easy way to avoid food waste. It’s a great option for using up bananas that would otherwise be tossed out. Simply mash them up and you’re ready to go!
The beauty of this recipe is that you only need two bananas, so it’s perfect for smaller batches. Next time you have bananas that are a little too ripe to eat on their own, turn them into a delicious loaf of banana bread—your taste buds will thank you!
Small Batch, Quick, and Easy to Make
This 2 banana bread recipe is the ideal choice when you want a small batch of freshly baked bread without spending hours in the kitchen. Unlike traditional banana bread recipes that may require larger quantities of ingredients, this one is perfectly scaled down for just two bananas, making it the ideal recipe for smaller households or anyone looking for a quick baking project.
Not only is it a small batch, but it’s also incredibly quick and easy to prepare. From start to finish, you can have a delicious loaf of banana bread ready in under an hour. The steps are straightforward—mash the bananas, mix the dry ingredients, then combine everything together. There’s no need for an electric mixer, and it can all be done with just a bowl and a spoon, making cleanup a breeze.
This recipe is especially perfect for busy days when you need a simple treat without the commitment of a complex bake. It’s also great for beginners, as it doesn’t require advanced techniques, special equipment, or a lot of time.
In addition to being quick, the small batch size means you’re less likely to have leftovers hanging around for days, which is especially helpful if you’re just baking for yourself or a small group. You can easily adjust the recipe if you want to make a larger batch, but this simple, smaller version is ideal when you’re short on time or ingredients.
No Fancy Ingredients—Just Pantry Staples
One of the best things about this 2 banana bread recipe is how accessible it is. You don’t need any specialty ingredients or hard-to-find items to make this delicious bread—just simple pantry staples you likely already have on hand. This means you can get started right away, without any last-minute trips to the store.
The main ingredients include flour, sugar, eggs, butter, and baking soda—all of which are common items you likely keep in your kitchen. Bananas, of course, are the star ingredient, and using overripe bananas enhances the sweetness and moisture of the bread without needing to add extra sugar. This recipe is all about simplicity and ease, relying on basic baking essentials that most people already know how to work with.
For flavor, you can use vanilla extract—another pantry staple that adds depth and richness to the bread. If you like to customize your banana bread, consider adding items you already have, such as cinnamon, chocolate chips, or walnuts, but these are completely optional. The beauty of this recipe is that it’s incredibly versatile and forgiving.
By focusing on ingredients you probably already own, this banana bread recipe saves you time and money, making it the perfect choice for a quick baking fix. So, when you find yourself with just a couple of ripe bananas, you’ll have everything you need to make a delicious loaf with ingredients you already trust.
Ingredients You Need for This Simple Banana Bread
Main Ingredients
The beauty of this 2 banana bread recipe lies in its simplicity, relying on just a few main ingredients that come together to create a moist, flavorful loaf. Let’s break them down:
- Bananas: The star of the show, bananas bring both flavor and moisture to the bread. The riper the bananas, the better! Overripe bananas, with their natural sweetness, make the bread even richer and more flavorful.
- All-Purpose Flour: This versatile flour is the base of the bread and provides the structure needed for the loaf. You don’t need anything fancy—plain all-purpose flour works perfectly in this recipe to give you that classic banana bread texture.
- Sugar: A combination of granulated sugar adds just the right amount of sweetness. While the bananas contribute natural sugars, a bit of extra sweetness balances out the bread and enhances the flavor. You can even try brown sugar for a hint of molasses flavor if you like!
- Butter: Butter adds both richness and moisture, giving the bread a soft, tender crumb. It also contributes a delicious buttery flavor that complements the bananas perfectly. If you prefer, you can swap it for vegetable oil or a dairy-free butter substitute.
- Eggs: Eggs help bind the ingredients together and provide moisture, contributing to the bread’s soft, fluffy texture. They also act as a leavening agent, helping the bread rise during baking.
These main ingredients come together effortlessly, making this banana bread both easy and delicious, with a simple pantry list that you’ll always have on hand.
Baking Essentials
While the main ingredients give your 2 banana bread recipe its flavor and texture, the baking essentials ensure that the bread rises properly and has the perfect consistency. These key ingredients are often overlooked, but they play a crucial role in turning a simple batter into a delicious loaf of banana bread.
- Baking Soda: This is the primary leavening agent in the recipe. It helps the bread rise by reacting with the acidity in the bananas. As the baking soda bubbles up, it creates air pockets in the batter, resulting in a light and fluffy texture. Be sure to use fresh baking soda for the best results!
- Baking Powder: While baking soda does most of the work, baking powder can be used alongside it to provide a little extra lift. Baking powder ensures that the banana bread remains soft and tender, preventing it from becoming dense or heavy.
- Vanilla Extract: Although not a leavening agent, vanilla extract is a baking essential that elevates the flavor of the bread. It brings a subtle, sweet aroma and depth of flavor that perfectly complements the bananas. It’s a simple ingredient, but it makes all the difference in flavor.
These baking essentials work together to ensure your banana bread turns out with the perfect texture, rise, and flavor. Even though they’re basic pantry items, they’re key to getting that perfect loaf every time. Make sure to check that your baking soda and powder are fresh, as this will make a noticeable difference in your final result.
Optional Add-Ins
While the 2 banana bread recipe is already delicious on its own, you can easily customize it with a variety of optional add-ins to take your loaf to the next level. These add-ins allow you to get creative and adjust the flavor and texture to your liking. Here are a few options to consider:
- Chocolate Chips: A classic addition, chocolate chips melt beautifully into the bread, adding bursts of rich, gooey chocolate in every bite. Use semi-sweet or dark chocolate for a balanced sweetness that complements the bananas.
- Nuts: Walnuts, pecans, or even almonds can add a delightful crunch and depth of flavor to your banana bread. Toasting the nuts beforehand enhances their flavor, making them even more delicious. Just chop them into small pieces and fold them into the batter.
- Cinnamon: If you love warm spices, a teaspoon of ground cinnamon adds a cozy, aromatic touch to your banana bread. Cinnamon pairs wonderfully with bananas and gives the loaf an extra layer of flavor.
- Dried Fruit: For a fruity twist, try adding dried cranberries, raisins, or chopped dried apricots. These add a touch of tartness and chewiness, balancing the sweetness of the bananas.
- Shredded Coconut: For a tropical vibe, shredded coconut adds a mild sweetness and chewy texture that pairs beautifully with the bananas.
These optional add-ins allow you to make your banana bread truly unique and tailored to your taste. Feel free to experiment and find your favorite combination!
Step-by-Step Instructions to Make Banana Bread with 2 Bananas
Preheat Oven & Prepare the Loaf Pan
Before you start mixing your ingredients, it’s important to preheat your oven and prepare your loaf pan. This step ensures that your banana bread bakes evenly and comes out with a perfect golden-brown crust.
- Preheating the Oven: Set your oven to 350°F (175°C) and allow it to fully heat up before you put your banana bread in. Preheating ensures that the batter begins cooking immediately once it hits the pan, helping the loaf rise properly. An oven that’s not fully preheated may result in uneven baking and a dense texture, so this step is crucial for the best results.
- Preparing the Loaf Pan: To prevent the banana bread from sticking to the pan, you’ll need to properly prepare it. Grease the loaf pan with butter or non-stick cooking spray, making sure to cover the bottom and sides evenly. Alternatively, you can line the pan with parchment paper for an extra layer of protection. If you prefer a non-stick method, simply dust the greased pan with a light coating of flour. This will create a barrier between the bread and the pan, making it easier to remove the loaf once it’s baked.
Taking these steps ensures your banana bread bakes evenly and releases easily from the pan, giving you a beautifully golden loaf with minimal mess. After this preparation, you’ll be ready to pour your batter into the pan and bake it to perfection!
Mash the Bananas & Mix Wet Ingredients
The next step in making your 2 banana bread recipe is mashing the bananas and combining the wet ingredients. This step is quick but essential to get that perfect texture and flavor.
- Mash the Bananas: Start by peeling your bananas and placing them in a large mixing bowl. Use a fork or potato masher to mash the bananas until they’re smooth with just a few small lumps left. The riper your bananas, the easier they’ll mash and the sweeter they’ll taste. The mashed bananas provide both moisture and flavor to the bread, so it’s important to make sure they are well mashed to ensure an even texture throughout the loaf.
- Mix Wet Ingredients: Once the bananas are mashed, add the other wet ingredients—melted butter, eggs, and vanilla extract. Use a whisk or spoon to stir them together until well combined. The butter adds richness, while the eggs help bind the ingredients and contribute to the bread’s soft texture. The vanilla extract brings a subtle sweetness that complements the bananas. Mix these ingredients thoroughly to create a smooth, cohesive batter base.
By mashing the bananas and blending the wet ingredients together first, you create a flavorful and moist foundation for your banana bread. This step also ensures that the bananas are evenly distributed throughout the batter, giving each bite the same perfect balance of flavor and texture.
Combine Dry Ingredients & Mix with Wet Ingredients
Once your wet ingredients are fully mixed, it’s time to add the dry ingredients. This step ensures a smooth, well-blended batter that will give your banana bread the perfect texture and rise.
- Combine the Dry Ingredients: In a separate bowl, whisk together the all-purpose flour, baking soda, and salt. The flour forms the structure of the bread, while the baking soda helps it rise and achieve a light, fluffy texture. The salt balances out the sweetness of the bananas and enhances the overall flavor. Be sure to mix these dry ingredients thoroughly to distribute the baking soda and salt evenly throughout the flour.
- Mix Wet and Dry Ingredients: Gradually add the dry ingredients to the wet mixture of mashed bananas, eggs, and butter. It’s important to do this in small increments to avoid overmixing, which can lead to a dense loaf. Use a spatula or wooden spoon to gently fold the dry ingredients into the wet mixture, stirring just until combined. A few small lumps in the batter are perfectly fine—this will help keep the texture light and airy. Avoid overmixing, as this can develop the gluten in the flour, resulting in a tough banana bread.
By combining the wet and dry ingredients carefully, you ensure that the batter is well-mixed without being overworked, giving you a soft and tender loaf every time.
Bake, Cool, and Enjoy!
The final steps in making your 2 banana bread recipe are all about baking, cooling, and, of course, enjoying the delicious result.
- Bake the Banana Bread: Once your batter is mixed, pour it into your prepared loaf pan. Smooth the top with a spatula to ensure even baking. Place the pan in the preheated oven at 350°F (175°C) and bake for about 50–60 minutes. The baking time can vary slightly depending on your oven, so it’s important to keep an eye on the bread. After 50 minutes, check by inserting a toothpick or skewer into the center of the loaf. If it comes out clean or with a few moist crumbs, the bread is done. If not, give it a little more time, checking every 5 minutes.
- Cool the Bread: Once baked, remove the banana bread from the oven and let it cool in the pan for 10–15 minutes. This allows it to firm up, making it easier to remove. After the initial cooling period, transfer the bread to a cooling rack to cool completely. Allowing the bread to cool before slicing will prevent it from becoming too mushy and give it a better texture when sliced.
- Enjoy Your Fresh Banana Bread: Once the bread is cooled, it’s time to slice and enjoy! Serve it plain or spread with a bit of butter, nut butter, or even a drizzle of honey. Whether you’re having it for breakfast, as a snack, or as a dessert, this homemade banana bread is a treat for any occasion!
Tips for the Best Moist and Fluffy Banana Bread
How to Keep Banana Bread Soft and Moist
To ensure your banana bread stays soft and moist, there are a few simple tips and tricks to follow. These methods help maintain the perfect texture and flavor, even after storing it for a few days.
- Use Ripe Bananas: The key to moist banana bread is using ripe bananas. The riper the bananas, the more natural moisture and sweetness they contribute to the bread. Overripe bananas, with brown spots, will yield the softest loaf.
- Don’t Overmix the Batter: Overmixing the batter activates the gluten in the flour, which can result in a dense and dry loaf. Mix the ingredients gently until just combined, leaving a few lumps in the batter for the best texture.
- Add Moisture-Rich Ingredients: Butter and eggs are essential for adding moisture. If you want an even softer loaf, consider adding a small amount of sour cream or yogurt. These ingredients not only provide extra moisture but also enhance the flavor and texture of the bread.
- Cover While Baking: If you notice the top of the banana bread browning too quickly, cover the loaf loosely with aluminum foil about halfway through baking. This helps retain moisture while allowing the bread to bake through without overbaking the top.
- Store Properly: To keep banana bread moist after baking, wrap it in plastic wrap or store it in an airtight container at room temperature. For longer storage, you can freeze slices, then reheat them for a fresh-tasting treat.
These simple steps ensure that your banana bread stays soft, moist, and delicious for days!
Best Substitutes for Butter or Eggs (Dairy-Free Options)
If you’re looking to make your 2 banana bread recipe dairy-free, there are several great substitutes for butter and eggs that maintain the delicious texture and flavor of traditional banana bread. Whether you have dietary restrictions or prefer plant-based ingredients, these swaps will help you create a tasty loaf.
- Butter Substitutes:
- Coconut Oil: Coconut oil is an excellent dairy-free alternative to butter. It adds moisture and a slight coconut flavor, which complements the bananas beautifully. Use the same amount of melted coconut oil as the butter called for in the recipe.
- Vegetable Oil or Canola Oil: Both oils provide moisture without altering the flavor of the bread. Use an equal amount of oil as you would butter.
- Applesauce: For a lighter version, unsweetened applesauce can replace butter, giving the banana bread a soft, tender texture. Use a 1:1 ratio for substitution.
- Egg Substitutes:
- Flaxseed Meal: Mix 1 tablespoon of ground flaxseed with 3 tablespoons of water, let it sit for 5 minutes to thicken, and use it to replace one egg. Flaxseed provides moisture and helps bind the ingredients.
- Chia Seeds: Like flaxseed, chia seeds can create a gel when mixed with water. Combine 1 tablespoon of chia seeds with 3 tablespoons of water to replace one egg.
- Mashed Banana: If you’re looking to enhance the banana flavor, use mashed banana as a substitute for eggs. Use 1/4 cup of mashed banana per egg. This not only keeps your bread dairy-free but also adds extra moisture.
These substitutes allow you to make a dairy-free and egg-free banana bread without compromising on taste or texture.
Storage Tips: Keeping Banana Bread Fresh Longer
To enjoy your delicious banana bread over several days, proper storage is key to maintaining its freshness and moisture. Here are a few simple tips to keep your banana bread tasting just-baked for longer.
- Cool Completely Before Storing: Always allow your banana bread to cool completely before storing. If stored while still warm, condensation can form, making the bread soggy and encouraging mold growth. Let it cool on a cooling rack for about 15–20 minutes after baking.
- Wrap It Properly: After the bread has cooled, wrap it tightly in plastic wrap or place it in an airtight container. This helps to lock in moisture and prevent it from drying out. If you’re wrapping it in plastic wrap, you can also place it in a resealable plastic bag for added protection.
- Store at Room Temperature: For up to 3–4 days, keep your banana bread stored in a cool, dry place at room temperature. Make sure it’s out of direct sunlight and away from heat sources, as exposure to light and heat can make it stale faster.
- Freezing for Long-Term Storage: If you want to keep your banana bread fresh for a longer period, freeze it! Wrap the loaf tightly in plastic wrap or aluminum foil and place it in a freezer bag. To thaw, simply leave it at room temperature for a few hours, or warm it up in the oven at a low temperature for a freshly-baked taste.
These simple storage tips ensure your banana bread stays soft and moist for days, and it’s a great way to prevent waste by keeping it fresh longer.
Frequently Asked Questions (FAQs)
Can I Use Frozen Bananas for This Recipe?
Yes, you can absolutely use frozen bananas in your banana bread recipe! In fact, they can work perfectly, especially if you have ripe bananas that are nearing the end of their shelf life. Here’s how to make the most of frozen bananas in your banana bread:
- Thawing Frozen Bananas: Start by removing the frozen bananas from their peel and placing them in a bowl. Allow them to thaw at room temperature for about 1–2 hours. You can also microwave them in short bursts if you’re in a hurry, but be sure not to overheat them. Once thawed, the bananas will be soft and ready to mash.
- Mashed Consistency: Thawing frozen bananas tends to break down the banana’s texture, making them very soft and easy to mash. This is ideal for banana bread because the extra moisture from thawed bananas will contribute to a soft and tender loaf. Just mash the thawed bananas as you normally would and proceed with the recipe.
- Flavor and Texture: Freezing bananas actually enhances their sweetness, which means they’ll add even more flavor to your banana bread. Some people prefer frozen bananas because they tend to be sweeter and more concentrated in flavor than fresh bananas.
- No Need to Drain: When using frozen bananas, there’s no need to drain excess liquid. The moisture from the thawed bananas will naturally blend into the batter, helping to keep your banana bread moist.
Using frozen bananas is a great way to avoid wasting overripe fruit and still make delicious, flavorful banana bread!
How Can I Make This Banana Bread Gluten-Free?
Making your 2 banana bread recipe gluten-free is easy, and it can be just as delicious as the traditional version. By swapping out a few ingredients, you can create a moist, soft loaf that everyone can enjoy, regardless of dietary preferences.
- Gluten-Free Flour: The key to making banana bread gluten-free is using a gluten-free flour blend. Most gluten-free flour blends are made from a combination of rice flour, potato starch, and tapioca flour, which mimic the texture of wheat flour. Be sure to choose a 1:1 gluten-free flour blend, which is designed to be used as a direct substitute for regular all-purpose flour in most recipes. If you’re using single gluten-free flours, like almond flour or coconut flour, make sure to follow specific substitution ratios, as these flours have different properties.
- Xanthan Gum or Guar Gum: Many gluten-free flours require xanthan gum or guar gum to provide structure and help the bread hold together. If your gluten-free flour blend doesn’t already include it, you can add about 1/2 teaspoon of xanthan gum per cup of flour. This helps to give the banana bread a chewy, soft texture.
- Moisture Considerations: Gluten-free flours tend to absorb more liquid than regular flour. To compensate, consider adding an extra tablespoon of liquid—such as water, milk (or dairy-free milk), or even a bit of extra mashed banana—into the batter to keep the bread moist.
- Baking Time: Gluten-free banana bread may take a little longer to bake, so keep an eye on it. Start checking the bread for doneness after about 60 minutes, and make sure to insert a toothpick to check for doneness.
With these simple adjustments, you can easily make a gluten-free banana bread that’s just as delicious as the original!
Can I Add Chocolate Chips or Nuts?
Absolutely! Adding chocolate chips or nuts to your banana bread is a fantastic way to elevate its flavor and texture. Both options work beautifully with the sweet, moist banana bread, and you can customize the recipe to suit your preferences. Here’s how you can incorporate them:
- Chocolate Chips: Adding chocolate chips brings a delicious burst of sweetness and richness to each bite. You can use semi-sweet, dark, or milk chocolate chips, depending on your taste. For a fun twist, try using mini chocolate chips for a more evenly distributed chocolate flavor throughout the bread. Stir in about 1/2 to 3/4 cup of chocolate chips into the batter before pouring it into the pan. You can also sprinkle a few on top before baking for a decorative touch.
- Nuts: Chopped nuts like walnuts, pecans, or almonds add a delightful crunch and a nutty flavor that complements the soft texture of the banana bread. Add about 1/2 cup of chopped nuts to the batter for a satisfying texture contrast. Toasting the nuts before adding them can enhance their flavor, giving your banana bread a richer taste. If you want a mix of both, you can add chocolate chips and nuts together for a more indulgent treat.
- Other Mix-ins: Feel free to experiment with other mix-ins, such as dried fruit (like raisins or cranberries) or even shredded coconut, to further personalize your banana bread.
By adding these optional ingredients, you can make your banana bread even more delicious and fun to enjoy!
How Do I Store Banana Bread to Keep It Fresh?
To keep your banana bread moist and fresh for as long as possible, proper storage is essential. Here are some simple tips to help you store your banana bread so it stays just as delicious as when you first baked it:
- Cool Completely: Before storing, always allow your banana bread to cool completely. If you store it while it’s still warm, moisture from the bread can build up inside the storage container, leading to sogginess and potential mold growth. Let it cool on a cooling rack for about 15–20 minutes after baking.
- Wrap it Properly: Once cooled, wrap your banana bread tightly in plastic wrap or aluminum foil. This prevents air from getting in and drying out the bread. You can also store it in a resealable plastic bag or an airtight container for an extra layer of protection.
- Room Temperature Storage: For up to 3–4 days, you can store banana bread at room temperature. Make sure it’s kept in a cool, dry place away from direct sunlight or heat sources. A kitchen counter or a bread box works well for this. If it’s too warm, the bread may start to dry out or spoil faster.
- Freezing for Longer Storage: To keep your banana bread fresh for longer, freezing it is an excellent option. Wrap the bread tightly in plastic wrap or foil, then place it in a freezer-safe bag. When you’re ready to enjoy it, let it thaw at room temperature for several hours, or pop it in the microwave or oven to warm it up.
By following these storage tips, you’ll be able to enjoy fresh, delicious banana bread for days—or even weeks!
3 thoughts on “2 Banana Bread Recipe – The Easiest Way to Use Ripe Bananas”