
Welcome to the ultimate guide for creating a stunning vintage heart cake. This delightful retro heart-shaped pastry has become a sensation. It blends nostalgic design with modern culinary creativity.
From social media to home kitchens, the vintage heart cake has evolved. It has moved from a classic 1950s treat to a contemporary baking masterpiece.
Your journey into vintage heart cake creation begins here. Whether you’re planning a romantic celebration or just want to craft a show-stopping dessert, this guide has you covered. It will walk you through every delicious detail of making an authentic vintage heart cake.
Table of Contents
What Makes a Vintage Heart Cake So Special
Nostalgic heart baking is more than a tasty treat. It’s a trip back in time, connecting you with fond memories and old baking traditions. The old-fashioned valentine cake is not just a dessert. It’s a culinary masterpiece that captures the spirit of vintage celebrations.
Vintage heart cakes are unique, unlike today’s desserts. Here’s what makes them special:
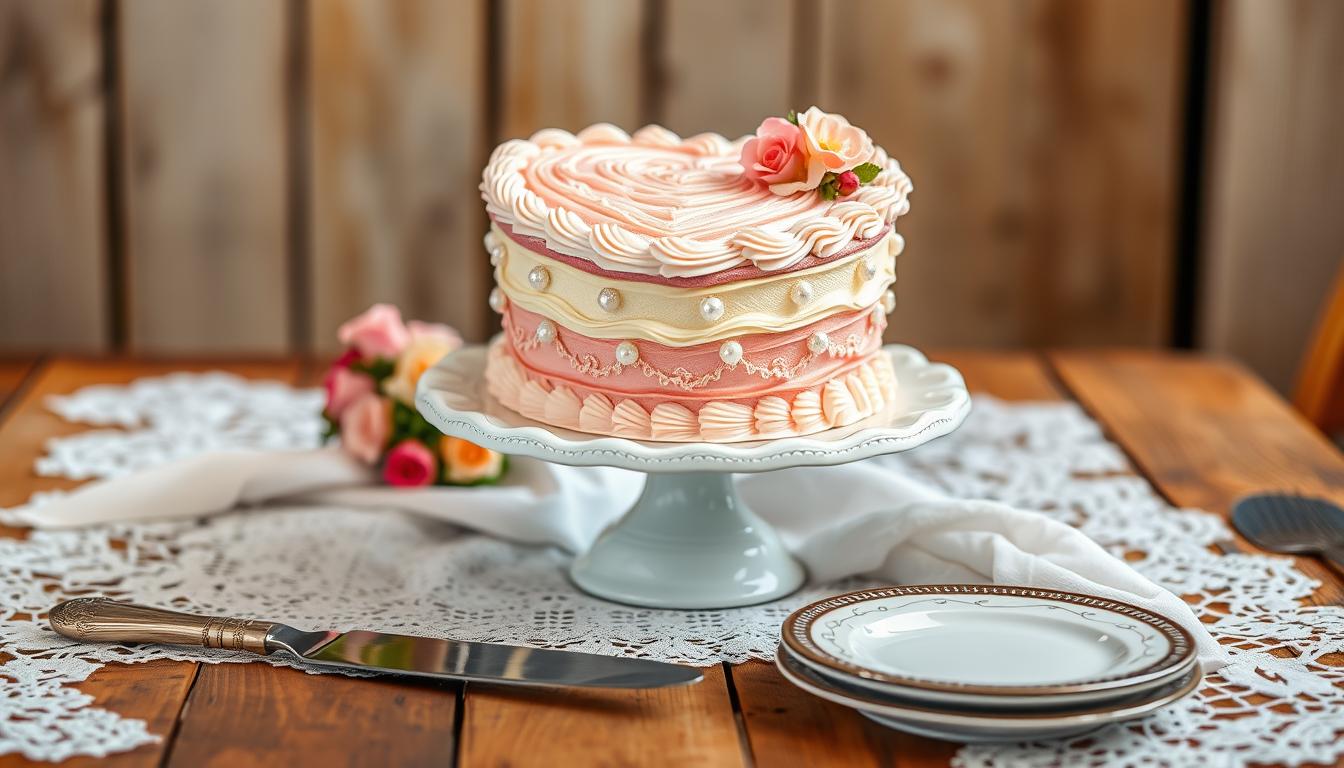
- Handcrafted buttercream piping that tells a story
- Soft, romantic pastel color palettes
- Intricate decorative details that showcase true baking skill
- Personal touches that evoke warm memories
The Nostalgic Appeal of Retro Cake Designs
These cakes take you back to a time of beautifully decorated bakery windows. Each slice is a piece of culinary history, showing the elegance of mid-century baking.
| Vintage Cake Feature | Modern Cake Characteristic |
|---|---|
| Hand-piped buttercream details | Smooth fondant covering |
| Soft pastel colors | Bold, vibrant designs |
| Personalized messages | Generic decorations |
Why Buttercream Piping Defines the Vintage Aesthetic
Buttercream is key in nostalgic heart baking. Its creamy texture lets bakers make detailed designs that fondant can’t. The way buttercream shines, adds depth, and tastes great makes it perfect for vintage cakes.
Buttercream turns a simple cake into a masterpiece. It creates delicate borders, romantic swags, and sweet messages that touch the heart.
Essential Ingredients for Your Vintage Heart Cake
Making a classic love confection begins with the right ingredients. Your vintage heart cake needs the perfect mix for that nostalgic taste and feel.
Cake Base Ingredients
- 2 cups all-purpose flour (provides structure)
- 1 cup granulated sugar (adds sweetness)
- 1 tablespoon baking powder (ensures light texture)
- 3 room-temperature eggs (helps with emulsification)
- 1 cup milk
- 1 teaspoon vanilla extract
- ½ cup unsalted butter (melted)
Buttercream Frosting Ingredients
- 1 cup unsalted butter (softened)
- 3 cups powdered sugar
- 3 tablespoons heavy cream
- 1 teaspoon vanilla extract
- Gel food coloring (pastel shades)
Your classic love confection needs top-notch ingredients. Choose real butter over margarine for a true vintage heart cake taste.
The secret to a perfect vintage cake lies in the quality of your ingredients!
Ingredient Quality Tips
| Ingredient | Quality Recommendation |
|---|---|
| Butter | Use high-quality, unsalted butter at correct temperature |
| Vanilla Extract | Pure vanilla extract preferred over artificial flavoring |
| Eggs | Room temperature eggs ensure better mixing |
| Flour | All-purpose flour works best for consistent texture |
Try adding almond extract or strawberry puree to your classic love confection. This will make it uniquely yours.
Tools and Equipment You Need for Heart-Shaped Baking
To make a traditional heart-themed dessert, you need the right tools and equipment. Baking a heart-shaped cake is not just about skill. It’s also about having the right gear to make your vintage cake vision come true. Each tool plays a key role in creating your masterpiece.
Choosing the right equipment can make baking fun instead of frustrating. Let’s look at the essential tools you’ll need for your traditional heart-themed dessert.
Selecting the Perfect Heart-Shaped Cake Pan
Your cake pan is the base of your heart-shaped creation. When picking one, consider these factors:
- Size options ranging from 8-9 inches
- Material considerations (aluminum vs. non-stick)
- Single large pan or multiple smaller pans for layered cakes
Piping and Decorating Tools for Vintage Charm
Use professional decorating tools to add vintage charm to your cake.
| Tool | Purpose | Recommended Tip |
|---|---|---|
| Piping Bag | Creating detailed decorations | Disposable or reusable |
| Star Tip | Shell borders and ruffles | PME 6 or Ateco 13 |
| Round Tip | Writing messages and dots | PME 1.5 |
Pro tip: An offset spatula is your secret weapon for smooth buttercream surfaces. Use it with a cake turntable for better decorating control.
Remember, the right tools are key to making a stunning traditional heart-themed dessert. It will look like it came from a vintage bakery.
Baking Your Perfect Heart-Shaped Cake Layers

Starting a rustic heart-shaped cake is all about perfect layers. You need to prepare carefully and pay attention to every detail. The right steps turn simple ingredients into a stunning centerpiece that will wow your guests.
Here’s what you’ll need for your rustic heart-shaped cake:
- All-purpose flour
- Baking powder
- Salt
- Eggs
- Granulated sugar
- Milk
- Vanilla extract
- Unsalted butter
Getting ready is crucial for a perfect cake. Preheat your oven to 350°F (175°C). Place the rack in the center. Grease your heart-shaped pan well, making sure to cover all curves and points.
Here are the essential baking steps:
- Whisk dry ingredients separately
- Beat wet ingredients until smooth
- Gradually combine wet and dry mixtures
- Incorporate melted butter gently
- Pour batter into prepared pan
- Tap pan to remove air bubbles
Baking time is usually 25-30 minutes. Check if it’s done by inserting a toothpick – it should be clean. Pro tip: Let the cake rest for 10 minutes before moving it to a wire rack. For a layered cake, bake two thinner cakes and cool them completely before stacking.
Creating Smooth and Fluffy Buttercream Frosting
Making the perfect buttercream frosting is key for any antique romantic dessert fan. Your vintage heart cake needs frosting that’s tasty and looks amazing. The right buttercream can turn a simple cake into a masterpiece.
Buttercream is the heart of classic cake decoration. To make silky smooth frosting, follow these steps:
- Start with room temperature unsalted butter
- Use a stand mixer for best results
- Sift powdered sugar to prevent lumps
- Add heavy cream for perfect consistency
Achieving the Perfect Buttercream Consistency
The secret to dreamy buttercream is its texture. Begin by beating your butter until it’s pale and creamy. Then, add powdered sugar slowly, mixing well after each addition. Aim for a frosting that’s smooth and spreadable but holds its shape.
Coloring Your Frosting in Vintage Pastel Shades
Make your antique romantic dessert pop with soft, delicate colors. Gel food coloring is best for vintage pastels. Start with small amounts and mix carefully:
- Soft Pink: A touch of rose-colored gel
- Baby Blue: Minimal blue gel coloring
- Mint Green: Delicate sage-inspired hue
- Lavender: Subtle purple undertones
Pro tip: Let your colored frosting rest for 15-20 minutes. The colors will deepen and soften, giving your cake that perfect vintage look.
Decorating Techniques for Authentic Vintage Heart Cake Style

To make a true heirloom valentine recipe, you need to learn special decorating skills. These skills bring the old-time charm of vintage cake design to life. Your journey to a perfect vintage heart cake starts with basic skills that turn a simple cake into a nostalgic work of art.
Begin by making your cake’s base layer perfect. Use an offset spatula to spread buttercream all over. Keep your angle steady and move smoothly to make a flawless base for your vintage design.
- Use a cake turntable for smoother buttercream application
- Hold your spatula at a slight 45-degree angle
- Work from the center outward for even coverage
- Refrigerate the cake for 10-15 minutes to set the base layer
The beauty of a vintage heart cake is in its unique charm. Love the handmade look that makes heirloom valentine recipes special. Your decorating should highlight the soft, slightly uneven texture. This texture shows off traditional baking methods.
| Technique | Purpose | Tips |
|---|---|---|
| Crumb Coat | Seal in cake crumbs | Apply thin, even layer before final frosting |
| Buttercream Consistency | Create smooth base | Adjust thickness for spreading vs. piping |
| Vintage Texture | Add authentic charm | Allow slight imperfections in frosting |
Focus on the heart shape’s curves and points. Each edge needs gentle care and precise technique. This keeps your cake’s vintage style memorable and unique.
Adding Retro Borders, Ruffles, and Shell Piping
To make your vintage heart cake stand out, you need to learn some special decorating tricks. Piping is key, as it brings your cake to life with detailed designs. These designs capture the old-time charm of classic cake decorating.
Vintage heart cake decoration is all about being precise and creative. Make sure your buttercream is just right. This ensures smooth, elegant piping.
Mastering the Star Tip for Classic Shell Borders
Shell borders are essential for a vintage heart cake. To get perfect shells, follow these steps:
- Use a PME 6 star tip for large outer borders
- Hold the piping bag at a 45-degree angle
- Apply steady pressure while pushing slightly forward
- Pull back to create the classic shell tail
- Overlap each shell with the previous one
Pro tip: Practice on parchment paper before decorating the cake. Consistency is key to achieving that authentic vintage look.
Creating Swags, Dots, and Personalized Messages
Add special touches to your vintage heart cake:
- Use a small round tip for graceful swags
- Create uniform dots by holding the tip perpendicular
- Practice writing messages on parchment first
- Experiment with pastel color combinations
Each vintage heart cake has its own story through decorations. Take your time, enjoy the process, and let your creativity show in every detail.
Flavor Variations and Creative Twists
Turn your retro heart-shaped pastry into a fun culinary journey. These exciting flavor mixes keep the classic look but add new tastes. Your guests will love them.
Classic Flavor Explorations
Your retro heart-shaped pastry is a blank canvas for creativity. Try these tasty options:
- Strawberry Dream: Add fresh strawberry puree for a soft pink color and sweet flavor
- Classic Chocolate: Mix in cocoa powder for a deep chocolate taste
- Vanilla Buttercream: A timeless pick that shows off old-school piping skills
Creative Filling Ideas
Make your retro heart-shaped pastry even better with these fillings:
- Lemon curd for a tangy surprise
- Raspberry compote for a fruity kick
- Chocolate ganache for a rich treat
Use natural food coloring to get those soft, vintage pastel colors. Try beet juice, spirulina, or turmeric. They’ll add a nostalgic touch to your cake.
Pro tip: Always taste-test your flavor combinations to ensure they harmonize perfectly!
Serving and Storing Your Vintage Heart-Shaped Cake
Keeping your old-fashioned valentine cake fresh and tasty is key. It needs special care from start to finish. This way, it stays beautiful and delicious until the last bite.
Storing your cake right is essential. Here are some tips to keep it fresh:
- Refrigerate the cake in an airtight container
- Use a cake dome instead of plastic wrap for delicate decorations
- Store for up to 3 days at cool temperatures
- Bring to room temperature before serving
Best Practices for Keeping Your Cake Fresh
Your vintage heart cake needs gentle care. Store it in a clean, airtight container. This prevents damage to the buttercream. Refrigeration keeps the cake fresh, but let it warm up before serving.
| Storage Method | Duration | Recommended Conditions |
|---|---|---|
| Refrigerator Storage | Up to 3 days | Airtight container, cake dome recommended |
| Freezer Storage | Up to 3 months | Wrap carefully, thaw overnight in refrigerator |
Slicing and Presenting Your Heart Cake
Getting the perfect slice is important. Use a warm knife for smooth cuts. Start by cutting down the center, then make perpendicular cuts for individual servings.
- Warm knife between cuts
- Slice gently to maintain decoration
- Serve on vintage-style plates
- Garnish with fresh berries or edible flowers
By following these tips, your vintage heart cake will impress everyone. It will look great and taste amazing.
Vintage Heart Cake Ideas for Every Occasion
Nostalgic heart baking makes any celebration unforgettable. Your vintage heart cake can be the star of many special moments. It can be tailored to fit any occasion.
For Valentine’s Day, go for classic red and pink. Make a cake that shows love’s beauty with:
- Heart-shaped sprinkles
- Delicate buttercream ruffles
- Sweet love messages in elegant script
Birthday celebrations are perfect for fun vintage heart baking. Try these ideas:
- Use cheerful pastel colors
- Add personalized name piping
- Incorporate edible glitter or themed candles
Anniversary and wedding cakes need a touch of elegance. Choose:
- Soft ivory or blush color palettes
- Delicate pearl piping details
- Romantic cursive messages
Pinterest and TikTok are great for finding vintage heart cake ideas. You can find everything from simple white cakes with red cherries to detailed shell-piped borders. The options are endless.
Conclusion
Making a classic love confection is more than just a recipe. It’s about creating a delicious masterpiece that tells a story. Your vintage heart cake is a mix of nostalgia, creativity, and personal touch. You’ve learned to turn a simple cake into a stunning work of art.
The beauty of your confection is in its imperfections. Each detail, like shell borders and ruffles, shows your unique style. Whether you’re new or experienced, remember that practice boosts confidence. Start simple and then try more complex designs. Your cake will grow with your skills, showing your progress.
Enjoy sharing your baking stories. When you finish your cake, take a photo. Share it online and use #VintageHeartCake. This way, you connect with other bakers and get inspired by their work.
Your vintage heart cake is more than dessert. It’s a celebration of love, creativity, and baking tradition. With every slice, you make memories that will last. Keep exploring, baking, and enjoying your culinary journey.