
There’s something magical about a cotton candy cake. Its whimsical look, pastel colors, and melt-in-your-mouth sweetness make it the perfect centerpiece for any celebration, whether it’s a birthday party, baby shower, or simply a fun weekend treat. The good news? You don’t have to be a professional baker to create this show-stopping dessert!
In this blog post, I’ll guide you through five easy steps to bake the perfect cotton candy cake from scratch. With a few simple ingredients, creative touches, and a little imagination, you’ll have a dreamy, candy-inspired cake that looks as good as it tastes. Get ready to wow your guests with this delightful treat—they’ll think you spent hours in the kitchen! Let’s get started!
Table of Contents
Gather Your Ingredients and Tools
Key Ingredients for the Cotton Candy Cake
Creating a cotton candy cake starts with choosing the right ingredients to capture the dreamy flavor and pastel aesthetic. Here’s a breakdown of the essentials:
- Flour
Use all-purpose flour or cake flour for a soft and tender crumb. Cake flour gives your layers an ultra-light texture, making each bite fluffy and delicate. - Sugar
Granulated sugar works perfectly to sweeten the batter. For an extra touch of flavor, consider adding a small amount of cotton candy sugar to enhance the theme. - Eggs
Eggs are crucial for binding the ingredients and creating a stable structure. Ensure they’re at room temperature for easier mixing and a smoother batter. - Butter or Oil
Use unsalted butter for a rich flavor or vegetable oil for a moist, melt-in-your-mouth texture. Both options work well depending on your preference. - Milk or Buttermilk
Milk adds moisture, while buttermilk gives a subtle tang and tenderizes the cake. The choice depends on whether you want a classic sweet base or a slightly tangy contrast. - Vanilla and Cotton Candy Flavoring
Vanilla extract provides a base of warm sweetness, while cotton candy flavoring brings the signature sugary taste that makes this cake so unique. - Food Coloring
Pastel shades, like light pink, blue, or lavender, give the cake its whimsical appearance. Gel food coloring works best for vibrant, even hues without thinning the batter.
These ingredients come together to create the perfect foundation for your cotton candy cake, ensuring it’s as flavorful as it is beautiful!
Frosting Essentials
The frosting is what takes your cotton candy cake from tasty to truly magical. Here’s how to make the perfect frosting to complement the fluffy, pastel layers of your cake:
- Butter
Start with unsalted butter at room temperature. Butter forms the base of your frosting, providing richness and a smooth texture that spreads beautifully on the cake layers. - Powdered Sugar
Powdered sugar gives the frosting its smooth consistency, helping it achieve that melt-in-your-mouth texture. It also sweetens the frosting to balance the cake’s flavors. - Cotton Candy Flavoring
To create that signature cotton candy taste, you’ll need cotton candy flavoring. A little goes a long way—just a few drops will transform your frosting into a sweet, airy treat that mirrors the essence of the carnival classic. - Milk or Heavy Cream
A small amount of milk or heavy cream is essential for achieving the right frosting consistency. Heavy cream makes for a richer, fluffier texture, while milk will give a lighter finish. Add slowly until you reach the desired spreadability. - Vanilla Extract
Vanilla adds a warm, complementary flavor to the frosting, balancing the sweetness of the cotton candy flavoring. It enhances the overall taste without overpowering the cake. - Food Coloring
To match the whimsical theme of your cotton candy cake, use pastel food coloring. Gel food coloring is ideal as it offers rich colors without watering down your frosting. Mix it in to achieve soft pinks, blues, or any color you desire.
With these essentials, you’ll create a frosting that’s both visually stunning and deliciously sweet, perfectly matching the cotton candy theme!
Tools You’ll Need
To ensure your cotton candy cake turns out as perfectly as you envision, having the right tools on hand is essential. Here are the key tools you’ll need:
- Mixing Bowls
You’ll need a few large mixing bowls to combine your cake ingredients and frosting. Opt for stainless steel or glass bowls, as they don’t retain odors and ensure even mixing. - Electric Mixer
An electric stand mixer or hand mixer makes mixing the cake batter and frosting easier and quicker. It ensures a smooth, lump-free batter and gives the frosting the right consistency without exhausting your arms. - Cake Pans
A set of round cake pans (typically 8 or 9 inches) is ideal for making the cake layers. Make sure to grease and line the pans with parchment paper to ensure the layers come out easily without sticking. - Spatula
A flexible silicone spatula is perfect for scraping down the sides of your mixing bowl and spreading frosting evenly across the cake layers. It helps you achieve a smooth and professional finish. - Piping Bags and Tips
For decorating your cotton candy cake with beautiful frosting patterns or delicate swirls, use piping bags fitted with various tips. A star tip can create lovely textured patterns, while a round tip works well for fine details. - Offset Spatula
This tool is perfect for smoothing out the frosting on your cake, especially when applying a crumb coat or final layer of frosting. The offset blade allows for more control, making it easier to work around the cake.
These tools will help you create a flawless cotton candy cake, from mixing to decorating, ensuring each step is as smooth as your frosting!
Prepare the Cake Batter
Mixing the Batter
Mixing the batter correctly is key to achieving a light and fluffy cotton candy cake. Here’s how to get it just right:
- Cream the Butter and Sugar
Start by creaming together the softened butter and sugar in your electric mixer. Beat them on medium speed for about 3-5 minutes until the mixture is light and fluffy. This process incorporates air into the batter, helping your cake layers rise and become tender. - Add the Eggs
Gradually add in the eggs, one at a time, ensuring each is fully incorporated before adding the next. Beating the eggs well helps to provide structure to the cake. It also helps to prevent a dense or heavy texture. - Incorporate Dry Ingredients
In a separate bowl, sift together the dry ingredients—flour, baking powder, and salt. Sifting helps to remove any lumps and evenly distribute the dry ingredients. Gradually add the dry ingredients to the wet mixture in batches, alternating with your milk or buttermilk. Mix at a low speed to avoid overworking the batter, which can lead to a dense cake. - Add Food Coloring and Flavoring
Once your batter is fully mixed, add a few drops of food coloring to create pastel hues. This is where you can make your cake truly unique, with soft pinks, blues, or purples. Be sure to also add cotton candy flavoring at this stage, mixing it in until the flavor is evenly distributed. - Check the Consistency
The batter should be smooth and slightly thick, but still pourable. If it’s too thick, add a bit more milk to loosen it up. Be sure not to overmix—just until the ingredients are combined to avoid tough cake layers.
With these steps, you’ll have a smooth, fluffy batter ready for baking!
Adding the Cotton Candy Flavor
The cotton candy flavor is the star of this cake, and getting it just right is essential to capturing that signature sweet, nostalgic taste. Here’s how to properly incorporate it into your cake:
- Choose the Right Cotton Candy Flavoring
Start by selecting a high-quality cotton candy flavoring. You can find these flavorings online or at specialty baking stores. Look for options that are specifically designed for use in cake batters and frostings, as they’ll provide the best flavor without being overpowering. - Measure the Flavoring
Cotton candy flavoring is concentrated, so a little goes a long way. Start with 1-2 teaspoons and taste test as you go. You can always add more if you want a stronger flavor, but be cautious not to overpower the cake’s natural sweetness. - Add Flavoring to the Batter
After the dry ingredients and wet ingredients have been mixed together, it’s time to add the cotton candy flavoring. Add it in with the food coloring, so the flavor is evenly distributed throughout the batter. Mix on low speed until it’s fully incorporated. The batter should now have a light, sweet aroma that matches the cotton candy theme. - Taste and Adjust
If you’re unsure about the intensity of the flavor, do a quick taste test by dipping a spoon into the batter. Keep in mind that the flavor will mellow slightly after baking, so if it tastes strong while raw, it will likely be perfect once the cake is finished.
With the right balance of cotton candy flavor, your cake will have a deliciously sweet and nostalgic taste that will delight your guests!
Baking the Layers
Baking the cake layers is a crucial step in ensuring that your cotton candy cake has a perfect texture and even structure. Here’s how to bake the layers for the best results:
- Preheat the Oven
Before you even start preparing the cake batter, make sure your oven is preheated to the correct temperature (typically 350°F or 175°C). A preheated oven ensures that the cake layers bake evenly from the moment the batter is poured in. - Prepare the Cake Pans
Grease your cake pans with butter or cooking spray, and then line them with parchment paper. This helps the layers come out of the pans smoothly without sticking. You can also lightly flour the pans if you prefer, but parchment paper gives the best results for easy removal. - Evenly Divide the Batter
Once your batter is ready, divide it evenly between the prepared cake pans. Use a spatula to smooth the tops of the batter and ensure they are level. This ensures that the layers bake evenly and prevents one side from rising higher than the other. - Bake and Monitor the Time
Place the pans in the preheated oven and bake for about 25-30 minutes. Every oven is different, so start checking the cake layers around 20 minutes. Insert a toothpick into the center of the layers—if it comes out clean, the cake is done. If it comes out with batter, give it a few more minutes. - Cool the Layers
Once baked, allow the cake layers to cool in the pans for 10-15 minutes. Then, turn them out onto a wire rack to cool completely. This prevents the layers from becoming soggy and ensures they’re firm enough for frosting and decorating.
By following these tips, you’ll have perfectly baked cotton candy cake layers, ready to be frosted and assembled!
Make the Cotton Candy Frosting
Buttercream Base
The buttercream base is essential for a smooth and flavorful frosting that perfectly complements the sweet, airy texture of your cotton candy cake. Here’s how to make a rich, fluffy buttercream base:
- Start with Softened Butter
Begin by using unsalted butter at room temperature. Softened butter is easier to mix and will yield a smoother frosting. Beat the butter for about 3-5 minutes using an electric mixer, on medium speed, until it’s light and creamy. This step incorporates air into the butter, which will make the frosting fluffy and easy to spread. - Add Powdered Sugar
Gradually sift in powdered sugar, about 1 cup at a time, while mixing at a low speed. Powdered sugar helps thicken the buttercream and gives it that sweet, melt-in-your-mouth texture. After each addition, scrape down the sides of the bowl to ensure everything is incorporated. - Incorporate Liquid
To achieve the right consistency, slowly add a tablespoon of milk or heavy cream at a time. Continue mixing until the frosting is smooth and spreadable, with a fluffy consistency that holds its shape. For a richer, thicker frosting, heavy cream works best, but milk will yield a lighter finish. - Flavor the Buttercream
For a deliciously sweet base, add a teaspoon of vanilla extract. This adds a warm, subtle depth to balance the sweetness of the powdered sugar. If you’re making a cotton candy cake, this is also the stage to add a few drops of cotton candy flavoring to give your frosting that signature sweet taste.
The buttercream base is now ready to spread, pipe, and decorate your cotton candy cake, adding a creamy texture and rich flavor to every bite!
Incorporating Cotton Candy Flavoring
Incorporating cotton candy flavoring into your frosting is key to achieving that iconic, sugary, and nostalgic taste that makes a cotton candy cake so special. Here’s how to do it effectively:
- Choose the Right Flavoring
Cotton candy flavoring is available in liquid or concentrated form, specifically designed for baking. Be sure to choose a product that’s suitable for both the cake and the frosting. Cotton candy flavoring often comes in vibrant pink or blue, adding a touch of color to your frosting as well. - Start with a Small Amount
Cotton candy flavoring is highly concentrated, so begin by adding just 1-2 teaspoons to your buttercream base. Add it slowly while mixing to ensure the flavor is evenly distributed. Because the flavoring is strong, you can always add more to suit your taste, but be careful not to overdo it, as it can quickly become overpowering. - Taste as You Go
After adding the initial amount of flavoring, stop and taste the frosting. The cotton candy flavor should be sweet but not overwhelming. If you feel it needs a little more, add a few extra drops. Remember, the frosting will mellow slightly as it sets, so it’s better to under-flavor it initially than to risk having it too intense. - Incorporate with the Food Coloring
Since cotton candy flavoring often comes in vibrant hues, it’s a great idea to add your food coloring at the same time. Whether you’re going for pastel pinks, blues, or both, this step gives your frosting a fun and colorful look to match the flavor.
By following these steps, your frosting will have that perfect cotton candy flavor, complementing the sweetness of the cake and adding an extra touch of whimsy to your dessert!
Optional Color Variations
Color variations can add an extra layer of fun and creativity to your cotton candy cake. Whether you’re aiming for a soft pastel theme or something more vibrant, here’s how you can incorporate different colors into your cake and frosting:
- Pastel Colors for a Dreamy Effect
For a classic cotton candy look, opt for pastel shades like soft pink, blue, lavender, or mint. These colors give the cake a light, whimsical appearance, perfect for birthday parties, baby showers, or spring celebrations. To achieve pastel colors, use gel food coloring, which is concentrated and won’t thin out the frosting. Add one drop at a time and mix well to reach your desired shade. - Ombre Effect
If you want to create a beautiful ombre effect, divide your frosting into three or more bowls. Add a different amount of food coloring to each bowl, starting with a very light color and gradually darkening it. Spread the frosting in layers, from light to dark, on the cake for a smooth gradient effect that looks visually stunning. - Two-Tone Swirls
For a bolder look, you can pipe two-tone swirls or rosettes using two colors of frosting. Simply divide your piping bag into two sections, each filled with a different color, and pipe the frosting onto the cake. The two colors will mix as you pipe, creating beautiful swirls that match the cotton candy theme. - Rainbow Accents
If you’re feeling adventurous, you can go for a rainbow of colors for a vibrant, multi-colored cotton candy cake. Use a variety of pastel or bright colors and apply them in sections for a striking and colorful effect.
These color variations will give your cotton candy cake a playful and personalized touch, making it even more eye-catching and fun!
Assemble and Decorate the Cake
Layering the Cake
Layering the cake is an essential step in assembling a beautiful cotton candy cake. It’s all about ensuring each layer is evenly spaced, frosted, and stacked for a visually appealing and delicious final result. Here’s how to layer your cake:
- Level the Cake Layers
After baking and cooling your cake layers, use a serrated knife to level the tops of the cakes if they have domed. This ensures that each layer is flat, making it easier to stack them evenly. Leveling also prevents the cake from leaning to one side and gives it a professional look. - Place the First Layer
Start by placing one cake layer on a cake stand or serving plate. Lightly frost the top of the first layer to create a base for the next layer. This helps secure the layers and prevents them from sliding around. - Add the Second Layer
Place the second cake layer on top of the frosted base. Press down gently to ensure it sticks and stays in place. Repeat the frosting process between each layer to add a smooth, even coat of buttercream or frosting. This will create a sturdy foundation for the cake’s structure. - Continue Layering
If you have more than two layers, continue stacking the cake layers and frosting between them. Be sure to use an even amount of frosting between each layer to maintain balance. As you build up the layers, check that they are aligned properly to avoid a crooked cake. - Crumb Coat
After the layers are stacked, apply a thin “crumb coat” of frosting over the entire cake. This will seal in any crumbs and provide a smooth surface for the final layer of frosting.
With these steps, your cotton candy cake layers will be perfectly stacked and ready for decoration!
Frosting the Outside
Frosting the outside of the cake is the final step in creating a smooth, polished look for your cotton candy cake. Here’s how to achieve a flawless finish:
- Apply the Crumb Coat
Start by applying a thin, even layer of frosting over the entire cake. This initial layer, known as the “crumb coat,” helps seal in any crumbs and provides a smooth base for the final layer of frosting. Use an offset spatula or a bench scraper to spread the frosting evenly, making sure the coat is thin but covers the entire cake. Once done, chill the cake in the refrigerator for 15-20 minutes to firm up the crumb coat. - Smooth the Final Layer
After the crumb coat has set, apply a thicker layer of frosting over the cake. Start at the top and work your way down the sides, spreading the frosting evenly with an offset spatula. For a smooth, polished finish, use a bench scraper to level the frosting and remove any excess. Hold the scraper at a slight angle and gently smooth the frosting from top to bottom. - Create Decorative Texture (Optional)
If you prefer a textured look, you can use a piping bag with a decorative tip or the back of a spoon to create swirls or peaks in the frosting. This will give the outside of your cotton candy cake an elegant, whimsical touch. For a smooth finish, skip this step and keep the frosting sleek and minimal.
By following these steps, you’ll have a beautifully frosted cotton candy cake that’s ready to be decorated with color and creativity!
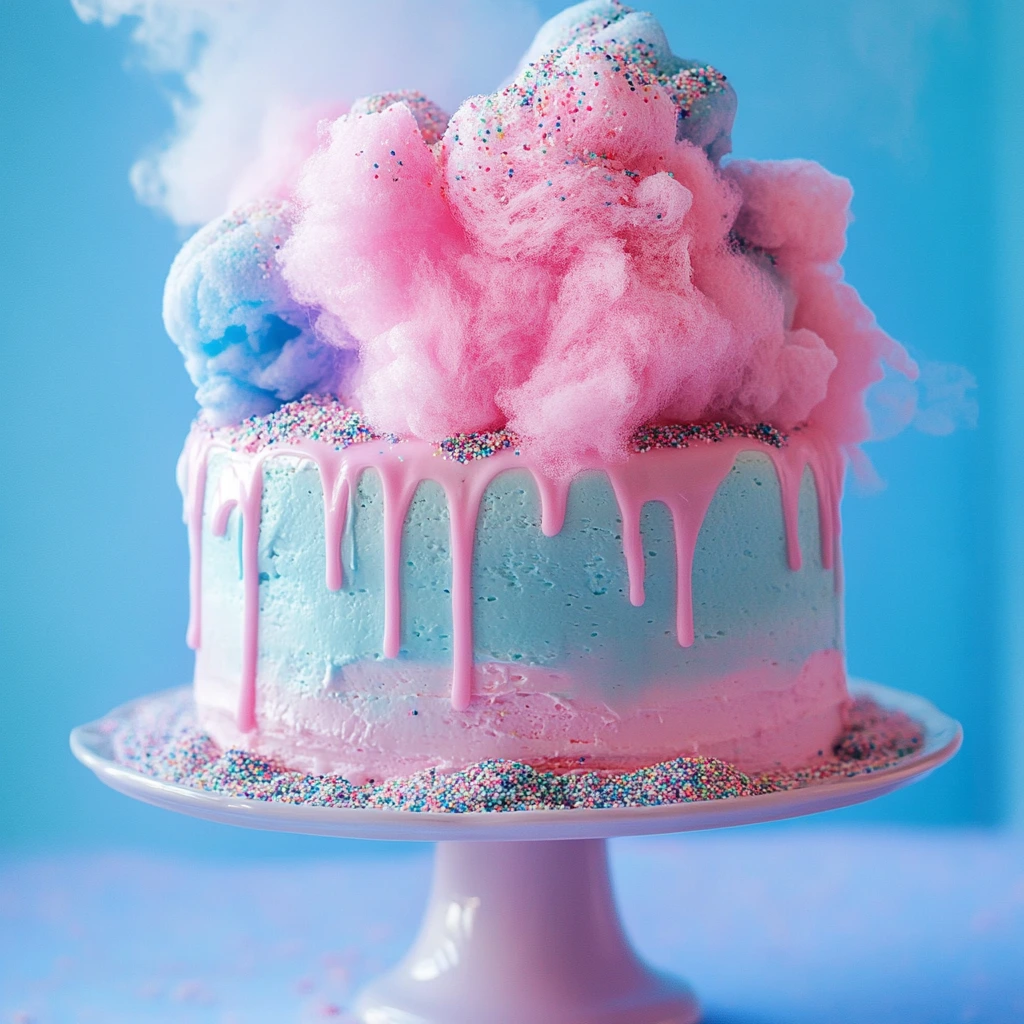
Cotton Candy Garnish
A cotton candy garnish is the perfect way to add a whimsical, fun, and signature touch to your cake, tying in the theme while enhancing its visual appeal. Here’s how to incorporate cotton candy garnish to make your cake stand out:
- Prepare the Cotton Candy
To create the garnish, you’ll need fresh cotton candy. You can either make your own at home using a cotton candy machine or buy pre-made cotton candy from a candy store or carnival supplier. If you’re making your own, simply spin the cotton candy on a machine, and then carefully separate the spun sugar into fluffy, airy clouds that will sit beautifully on top of the cake. - Shape the Cotton Candy
Once you have your cotton candy ready, carefully shape it into a mound or cloud-like form. You can do this by gently pulling the cotton candy apart and arranging it into a loose, airy shape that sits well atop the cake. If you’re using multiple colors, you can create a multi-colored cotton candy pile, adding an extra layer of fun and visual interest. - Place on the Cake
After shaping your cotton candy, place it on top of the frosted cake, being sure not to press down too hard. You want the cotton candy to maintain its light, fluffy appearance. Place it toward the center of the cake or one side for an asymmetrical, modern look. If you want to ensure it stays in place, you can use toothpicks or skewers (hidden beneath the cotton candy) to secure it gently without disturbing the delicate texture. - Add Final Touches
For an extra flair, consider adding sprinkles, edible glitter, or confetti around the cotton candy for additional sparkle. You can also match the colors of your frosting and cotton candy to the overall theme of your cake.
With this garnish, your cotton candy cake will not only taste delicious but also become a showstopper, captivating everyone with its playful and nostalgic charm.
Tips for Serving and Storing Your Cotton Candy Cake
Serving Suggestions
Serving your cotton candy cake is just as important as making it, as it sets the tone for how your creation will be enjoyed. Here are some ideas for presenting and serving your cotton candy cake to create a memorable experience:
- Serve with Fun Accompaniments
To enhance the cotton candy theme, pair the cake with additional sweet treats or toppings. Consider serving small cotton candy cones on the side or offering mini jars of colorful sprinkles. For a unique twist, you can also provide a few cotton candy-flavored beverages, like pink lemonade or a cotton candy milkshake, to complement the cake’s flavor profile. - Cutting the Cake
When it’s time to slice, make sure to use a sharp knife to ensure clean cuts through the frosting and cake layers. If you’ve used a cotton candy garnish on top, serve slices carefully so the cotton candy can be easily removed or enjoyed with the cake. You can also slice the cake into larger pieces for big events or small, bite-sized portions for a more intimate gathering. - Pair with Ice Cream
Serve slices of cotton candy cake with a scoop of ice cream for an indulgent dessert experience. Vanilla, strawberry, or bubblegum ice cream work wonderfully with the sweet and airy flavors of cotton candy, adding richness and creaminess to balance the cake’s light texture. - Themed Presentations
For themed parties or events, create a visually stunning presentation by placing the cake on a candy buffet table surrounded by jars of colorful candies, marshmallows, and whimsical decorations. This will make the cake feel like a centerpiece and tie into the playful, fun nature of the cotton candy flavor.
With these serving suggestions, your cotton candy cake will be the highlight of any celebration, providing both delightful flavors and a visually stunning treat for your guests!
Storage Tips
Proper storage is key to keeping your cotton candy cake fresh and delicious for as long as possible. Since cotton candy is delicate and can easily melt or lose its fluffiness, it’s important to follow a few tips to preserve both the cake and its garnish:
- Store the Cake in an Airtight Container
After serving, cover the leftover cotton candy cake with plastic wrap or place it in an airtight cake box to prevent it from drying out. This helps retain the moisture in the cake layers and keeps the frosting soft. For optimal freshness, store the cake at room temperature, especially if it will be consumed within a few days. - Avoid Storing Cotton Candy Garnish on the Cake
Cotton candy naturally begins to lose its texture and shape once it comes in contact with air or humidity. If you’re storing leftover cake, remove the cotton candy garnish before sealing the cake. Store the garnish separately in a cool, dry place in a loose bag or container to preserve its fluffiness until you’re ready to serve it again. - Refrigerate the Cake if Necessary
If the cake contains perishable ingredients like cream cheese or dairy-based frosting, it’s best to refrigerate the entire cake (minus the cotton candy garnish). However, refrigerating the cake can make the frosting firm and less smooth. Allow the cake to sit at room temperature for 15-20 minutes before serving so the frosting softens back to its original creamy texture. - Freezing the Cake
If you want to store the cake for a longer period, freezing is an option. Wrap the cake in plastic wrap and foil to protect it from freezer burn. Once frozen, you can keep the cake for up to 2-3 months. When ready to serve, allow the cake to thaw at room temperature and reapply the cotton candy garnish just before serving.
By following these storage tips, you’ll keep your cotton candy cake fresh and ready to be enjoyed even after the celebration!
Creative Variations
While a classic cotton candy cake is already a fun and whimsical treat, there are several creative variations you can try to personalize the cake and cater to different tastes. Here are some exciting twists to make your cotton candy cake even more unique:
- Cotton Candy-Filled Cake Layers
Take your cake to the next level by adding a cotton candy filling between the layers. Gently pull apart small pieces of cotton candy and place them between the cake layers before frosting. This creates a surprise element for your guests when they cut into the cake, offering an additional burst of sweetness and texture. - Cotton Candy Ice Cream Cake
For a cool, refreshing variation, consider making a cotton candy ice cream cake. Layer cotton candy-flavored ice cream between the cake layers, then frost with a cotton candy-infused buttercream. This combination is perfect for hot weather or for those who love ice cream and cake together. - Use Different Flavors of Cotton Candy
Experiment with different cotton candy flavors like blue raspberry, strawberry, or even tropical fruit to create a variety of flavor combinations in both the cake and the frosting. You can even match the cotton candy flavors with different color schemes for a vibrant, multi-flavored cake. - Add Fun Toppings
Enhance the whimsical nature of your cotton candy cake by adding fun toppings like sprinkles, edible glitter, or even colorful lollipops. For an extra dose of nostalgia, use mini candy cones or a sugar shard garnish to complement the cotton candy theme. - Mini Cotton Candy Cupcakes
If you prefer individual servings, try making mini cotton candy cupcakes. Bake small cupcakes and top them with cotton candy frosting and a small piece of cotton candy on top for a charming, bite-sized treat.
These creative variations allow you to adapt the cotton candy cake to fit any occasion or flavor preference, adding a personal and playful twist to your dessert!
Conclusion
The cotton candy cake recipe is both simple to execute and delightful to behold. With just a few basic ingredients—flour, sugar, eggs, and cotton candy flavoring—you can easily create a light, fluffy cake that captures the fun and whimsical essence of cotton candy. The steps are straightforward, from mixing the batter and baking the layers to frosting and garnishing with cotton candy. While it may sound complex, the process is manageable, making it a perfect project for bakers of all skill levels.
What truly sets this cake apart is its whimsical charm. The vibrant colors, airy texture, and fluffy cotton candy garnish create an unforgettable visual experience that’s sure to leave a lasting impression. The cake brings a playful, nostalgic vibe, evoking memories of fairs and fun celebrations. Its light, melt-in-your-mouth sweetness and cotton candy aroma make it an instant hit at birthday parties, baby showers, or any event where joy and fun are the main ingredients.
This cake is more than just a dessert—it’s a showpiece that captures the imagination and adds a touch of magic to any occasion. Whether you’re a seasoned baker or just looking to add a unique twist to your dessert table, the cotton candy cake is an easy and enchanting way to elevate any celebration with a touch of whimsy and sweetness.
3 thoughts on “Bake the Perfect Cotton Candy Cake in 5 Easy Steps”