
Looking for a dessert that’s easy to make and tastes amazing? This banana wafer pudding recipe is your answer. It’s a homemade treat that everyone will love. It turns simple ingredients into a creamy delight perfect for any occasion.
Many home cooks in the United States love this easy recipe. It doesn’t need baking. With fresh bananas, vanilla wafers, and rich pudding, it’s sure to be a hit at your next gathering.
Table of Contents
What is Banana Wafer Pudding?
Southern banana pudding is a favorite dessert in America. It’s more than a sweet treat. It’s a tradition of Southern hospitality and family gatherings.
“A classic Southern dessert that has been loved for generations”
This dessert has simple yet irresistible layers. It combines vanilla pudding, fresh banana slices, crispy vanilla wafers, and fluffy whipped topping. Together, they create a treat that delights your taste buds.
The Classic Southern Dessert Tradition
Banana pudding is a cultural icon in the South. You’ll find it at:
- Family reunions
- Church potlucks
- Summer barbecues
- Holiday celebrations
This dessert is more than food. It’s a symbol of warmth, community, and shared memories that connect generations.
No-Cook vs. Cooked Banana Pudding
There are two main ways to make southern banana pudding: no-cook and cooked. The main differences are:
- Preparation time
- Banana freshness
- Convenience
The no-cook version is popular because it keeps bananas fresh longer. It’s also great for traveling. This method uses instant pudding mix, making it quick and easy for gatherings.
Essential Ingredients for Homemade Banana Pudding
Making the perfect banana pudding starts with picking the right ingredients. Your creamy banana pudding needs the right mix of ingredients. These work together to make a delicious dessert.
For a true and tasty pudding, you’ll need these ingredients:
- Cream Cheese: 8 oz, room temperature (crucial for smooth texture)
- Sweetened Condensed Milk: 14 oz (not evaporated milk)
- Instant Vanilla Pudding Mix: 5 oz (must be instant, not cook-and-serve)
- Milk: 3 cups (2% or whole milk recommended)
- Vanilla Extract: 2 teaspoons
- Cool Whip: 8 oz (thawed)
- Nilla Wafers: 11 oz
- Bananas: 5-7 ripe bananas
Choosing the right bananas is crucial for your banana pudding. Look for yellow bananas with light brown speckles. These are perfectly ripe and will give the best flavor and texture.
Pro tip: Always use room temperature cream cheese to avoid lumpy pudding!
Your choice of ingredients can make or break a creamy banana pudding. Stick to name-brand items like Nilla Wafers and instant pudding mix for the best taste. Cool Whip is great for make-ahead desserts, as it stays stable longer than homemade whipped cream.
Why This Banana Wafer Pudding Recipe Works
Making the perfect no-bake banana pudding is a bit of magic. This recipe is special because it uses simple steps to make a classic dessert stand out.
The key to a great banana pudding is knowing how to prepare it. Success comes from two main things: a creamy base and fresh bananas.
The Perfect Cream Cheese Base
Cream cheese makes a simple pudding into a fancy treat. Make sure the cream cheese is completely at room temperature. This step is key to avoiding lumps and getting a smooth base.
- Beat cream cheese until silky and soft
- Incorporate sweetened condensed milk gradually
- Whip until no lumps remain
Keeping Your Bananas Fresh and Bright
Keeping bananas from turning brown is an art in this recipe. Bakers use simple tricks to keep them looking perfect.
- Lightly coat banana slices with citrus juice
- Use minimal citrus to avoid flavor interference
- Ensure pudding completely covers banana layers
With these tips, you’ll make a pudding that’s not just tasty but also looks amazing.
Step-by-Step Instructions for Making Creamy Banana Pudding
Making the perfect banana pudding is all about precision and care. These easy steps will help you make a delicious dessert that will wow your family and friends. Follow each step carefully to get a creamy, smooth banana pudding that everyone will love.
- Prepare your cream cheese base
- Use an electric mixer on medium speed
- Beat cream cheese until smooth and fluffy
- Ensure no lumps remain in the mixture
- Add ingredients gradually
- Pour in sweetened condensed milk
- Mix in pudding mix
- Slowly add milk to prevent splattering
- Final mixing technique
- Stir in vanilla extract
- Use low speed initially
- Scrape bowl sides with rubber spatula
When making banana pudding, mix well but gently. Start your mixer on low speed to avoid milk splashing. Keep mixing until the mixture thickens and becomes smooth, which usually takes 2-3 minutes.
| Mixing Stage | Key Actions | Time Estimate |
|---|---|---|
| Cream Cheese Base | Beat until fluffy | 2-3 minutes |
| Adding Ingredients | Gradual incorporation | 3-4 minutes |
| Final Mixing | Fold in whipped topping | 1-2 minutes |
Pro tip for your banana pudding recipe: Fold in half of the whipped topping gently to keep it light and airy. This way, your pudding stays creamy and delicious. With these easy steps, you’ll make a dessert that looks as good as it tastes!
Layering Your Vanilla Wafer Banana Pudding
Making a nilla wafer banana pudding is an art. It’s all about building it up right and making it look good.
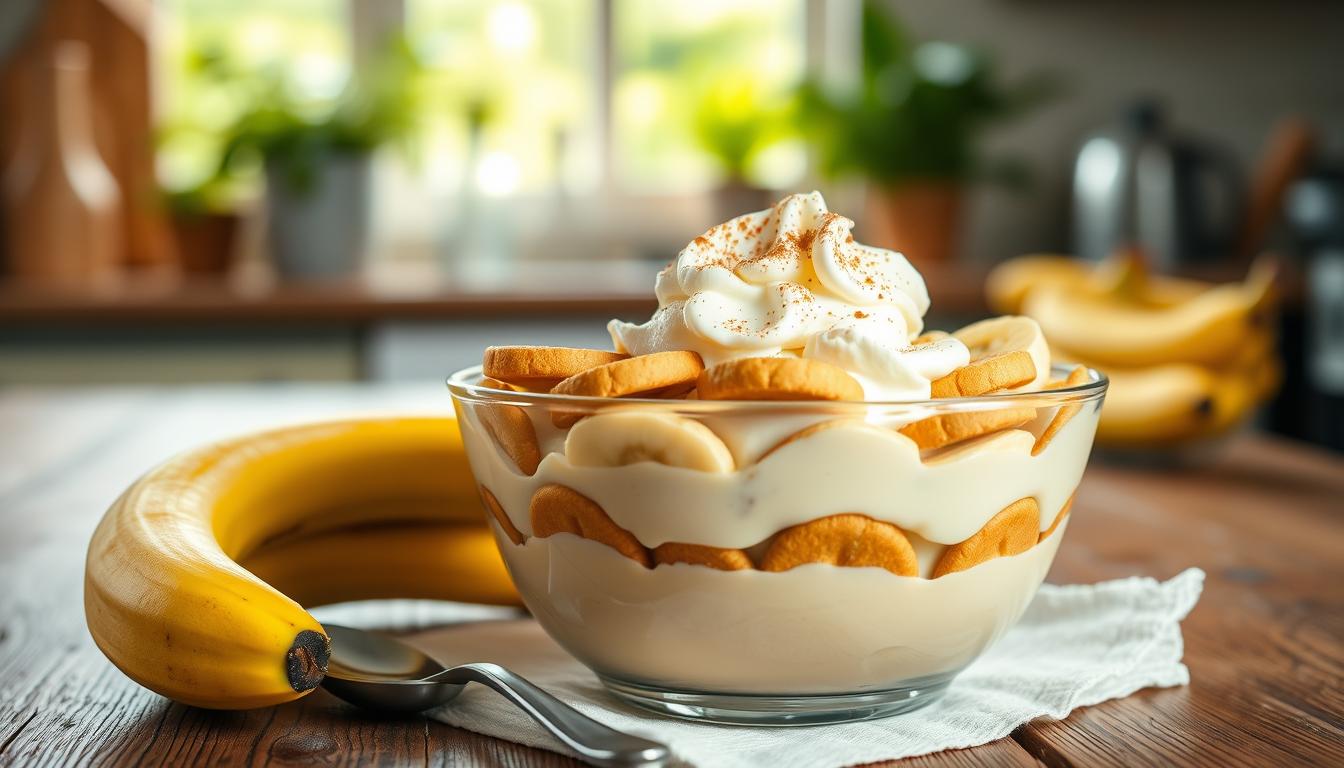
Creating Beautiful Layers in a Trifle Dish
Follow these steps to build your dessert:
- Use a clear glass dish to show off your layers
- Begin with a layer of vanilla wafers, some facing up
- Make layers that look good and taste great
Proper Banana and Wafer Distribution
To get the mix just right, place ingredients carefully:
| Layer | Recommended Distribution |
|---|---|
| Vanilla Wafers | 1/3 of the package per layer |
| Banana Slices | ¼-inch thick, covering entire wafer layer |
| Pudding | Enough to completely cover bananas |
“I want at least a piece of banana in every bite!” – Dessert Enthusiast
Tip: Go for three layers. Each bite should have creamy pudding, fresh bananas, and crisp vanilla wafers. Your dessert will be delicious and beautiful!
Creative Variations and Substitutions
Your classic banana pudding recipe doesn’t have to be boring! You can turn it into a fun culinary adventure. Just by making a few simple changes, you can make it your own.

Let’s explore some tasty pudding alternatives to make your banana wafer pudding even better:
- Cookie Swap: Replace vanilla wafers with:
- Graham crackers
- Shortbread cookies
- Pepperidge Farm Chessman butter cookies
- Animal crackers
- Pudding Flavor Twists:
- Chocolate pudding
- Banana cream pudding
- Butterscotch pudding
- Flavor Boosters:
- Add banana extract for intense flavor
- Swirl peanut butter between layers
- Drizzle caramel sauce on top
Try mixing fresh berries with your bananas for a fruit-focused version. Strawberries, blueberries, or raspberries can add color and sweetness.
| Variation Type | Recommendation |
|---|---|
| Cookie Alternative | Chessman Butter Cookies |
| Pudding Flavor | Banana Cream Instant Pudding |
| Fruit Addition | Mixed Berries |
The best banana pudding recipe is the one that makes you happy. So, don’t be shy to try new things and make it your own!
Storage Tips and Make-Ahead Instructions
Making a tasty homemade banana pudding doesn’t have to be rushed. This dessert is perfect for busy cooks who want to plan meals ahead. It’s easy to prepare and can be stored for later.
Preparing your banana pudding ahead of time can make it even better. The trick is to know how to store it right. This keeps the dessert fresh and looking great.
Refrigeration and Shelf Life
Your banana pudding can stay fresh in the fridge for up to three days. Here are some tips to keep it fresh:
- Always use an airtight container
- Cover the dish tightly with plastic wrap
- Store at consistent refrigeration temperature (40°F or below)
- Minimize exposure to air to prevent banana browning
Make-Ahead Strategy
This dessert is great because you can make it ahead of time. You can put it together up to 24 hours before serving. This lets the flavors mix and the wafers get soft.
Pro tip: For best results, wait to slice bananas until just before assembling to prevent premature browning.
But don’t freeze your banana pudding. Freezing messes up its texture and causes it to separate when thawed.
Serving Suggestions for Your Nilla Wafer Banana Pudding
Presenting your nilla wafer banana pudding right can make it go from tasty to breathtaking. You can serve it in many ways, from simple family-style to fancy party centerpiece.

Here are some tips to make your banana pudding stand out at any event:
- Classic Trifle Dish: Showcase beautiful layers in a clear glass bowl
- Individual Servings: Use mason jars or dessert cups for elegant portion control
- Family-Style: Serve in a 9×13-inch baking dish for casual events
To make your nilla wafer banana pudding even more appealing, try these garnishing ideas:
- Sprinkle crushed vanilla wafers on top
- Add fresh banana slices just before serving
- Create decorative whipped cream swirls
- Dust with a light sprinkle of cinnamon
Pro tip: Chill your serving dishes before serving to keep the pudding cool and creamy. Whether it’s a family dinner or a fancy party, these ideas will make your banana pudding look as good as it tastes.
Conclusion
Your journey to make the best banana wafer pudding is complete. This easy dessert is more than just a sweet treat. It’s a fun adventure that turns simple ingredients into a dessert everyone will adore.
Home cooks all over the United States have found the magic of this dessert. They say it’s a hit at family gatherings, holidays, and weekend parties. The recipe is so simple, even beginners can make a stunning dessert with little effort.
Remember, the secret to success is using room-temperature cream cheese and instant pudding mix. Also, layering the ingredients carefully is key. By following the recipe, you’ll get a creamy, dreamy dessert that looks amazing and tastes incredible. Every bite will show you why this recipe is a favorite in kitchens everywhere.
Your banana wafer pudding journey is just starting. Get your ingredients ready, keep things simple, and get ready to impress your family and friends. This dessert promises pure deliciousness in every spoonful.