
If you’re a fan of rustic, savory bread with a Mediterranean twist, then you’ll absolutely love this Olive Black Bread recipe. Combining the rich, earthy flavor of olives with a soft, hearty loaf, this bread is a perfect addition to any meal. Whether you’re enjoying it as a side to a flavorful soup, making sandwiches, or simply savoring it with a bit of olive oil and balsamic vinegar, olive black bread offers a delicious and versatile option. In this guide, we’ll show you how to create the perfect savory loaf from scratch, with step-by-step instructions that ensure your bread turns out perfectly every time. Get ready to bake a loaf that’s not only bursting with flavor but also easy to make, bringing a little taste of the Mediterranean to your kitchen.
What is Olive Black Bread?
Explain the concept of olive black bread and how it differs from regular bread
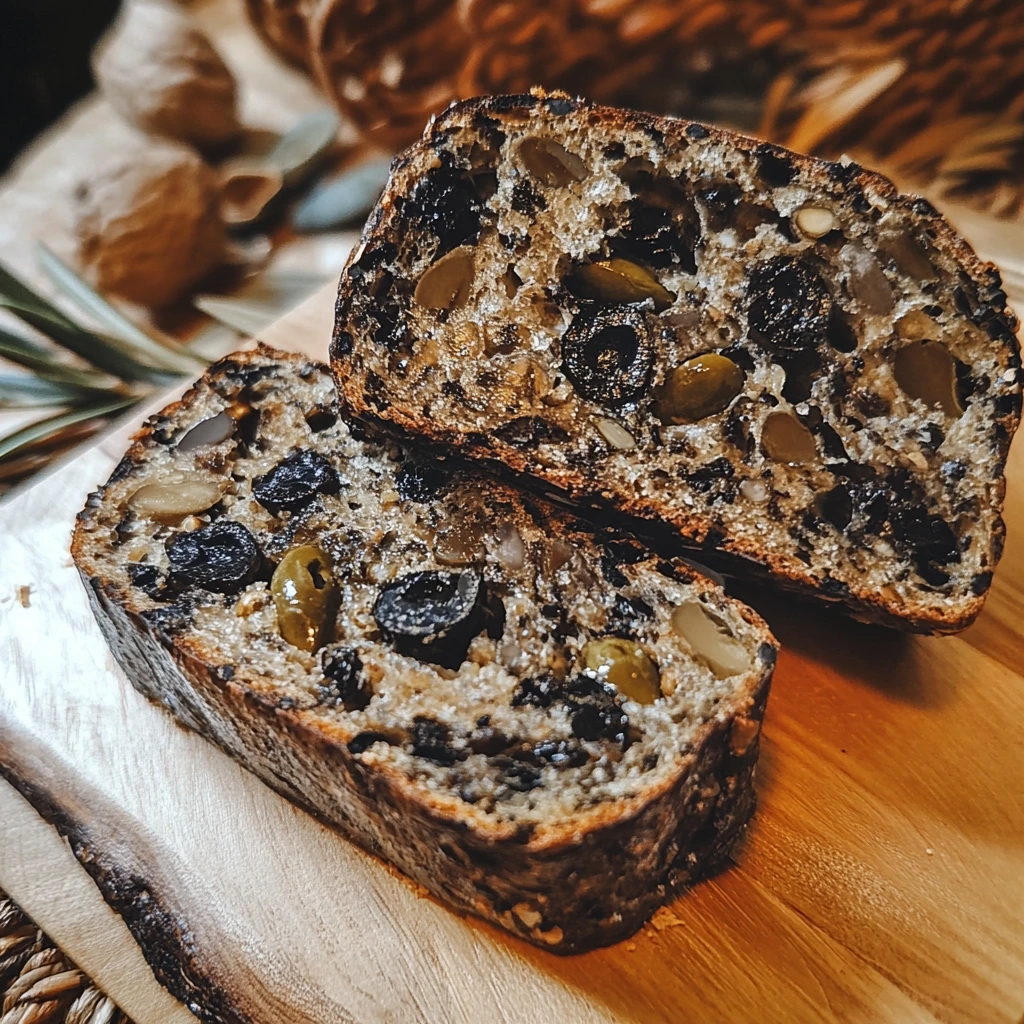
Olive black bread is a savory loaf made with olives, typically black varieties like Kalamata. The olives infuse the bread with a rich, tangy flavor. Unlike regular bread, which is neutral or slightly sweet, olive black bread is deeply flavorful and aromatic. The olives add both texture and taste, creating a bread that’s hearty and satisfying with each bite.
One of the main differences between olive black bread and traditional bread is the inclusion of olives. These olives enhance the flavor profile and add visual appeal. Their dark purple or black hue contrasts beautifully with the golden-brown crust. In many recipes, olives are chopped or left whole, offering bursts of salty flavor throughout the bread.
Another key difference is the use of olive oil. While regular bread recipes often call for butter or other oils, olive oil is a crucial ingredient in olive black bread, contributing to its moistness and subtle Mediterranean flavor. The oil also helps achieve a soft, tender crumb and a slightly crunchy, golden crust.
Olive black bread is often seen as a more rustic, artisan-style bread. It’s perfect for pairing with Mediterranean dishes like hummus, roasted vegetables, or grilled meats, and it can be enjoyed fresh out of the oven or toasted for a more intense flavor. The bread’s savory profile makes it a versatile choice for both casual meals and special occasions.
Discuss the significance of olives in Mediterranean and rustic bread recipes
Olives are central to Mediterranean cuisine. Their inclusion in rustic bread recipes highlights the region’s rich culinary traditions. Olives are a staple food and a symbol of the Mediterranean lifestyle, embodying its flavors and history. Their use in bread-making elevates the flavor, offering a savory, briny contrast to the soft, airy texture of the dough.
In Mediterranean bread recipes, olives are often added to create a deeper, more complex flavor profile. The natural oils in olives add moisture and tenderness to the bread. Their salty, tangy taste infuses each bite with character. Whether chopped or whole, olives give the bread a distinct texture, setting it apart from traditional, neutral-flavored loaves.
Rustic bread recipes, particularly those from countries like Italy, Greece, and Spain, have long included olives as a key ingredient. These breads are often made with simple, wholesome ingredients like flour, water, yeast, and salt, allowing the olives to shine as the star of the recipe. The addition of olives is a nod to the region’s emphasis on using fresh, locally grown ingredients to create flavorful, nourishing foods.
Beyond their flavor, olives also have cultural significance. In many Mediterranean regions, olive trees are considered sacred, and the fruit is a symbol of peace and longevity. By incorporating olives into bread, these recipes not only celebrate the region’s food but also its traditions and history.
Mention the types of olives that work best in this recipe
When making olive black bread, the type of olives you choose can significantly influence the flavor and texture of the loaf. There are a variety of olives to consider, each bringing its own unique qualities to the bread.
Kalamata olives are perhaps the most popular choice for this recipe. Known for their deep purple color and robust, tangy flavor, Kalamata olives infuse the bread with a bold, slightly fruity taste. Their firm texture also helps maintain a pleasant bite, making them ideal for rustic bread recipes.
Manzanilla olives, small and light green in color, are another excellent choice. These Spanish olives have a delicate briney taste with a hint of nuttiness, which adds a milder but still flavorful profile to the bread. Their slightly firmer texture holds up well in dough without becoming too mushy.
Nyon or black cured olives offer a rich, earthy flavor that complements the rustic nature of the bread. These olives are often cured in brine and then dried, which results in a deep, savory taste that enhances the overall loaf.
If you prefer a slightly milder taste, green olives, such as Arbequina, can also work well. They provide a fresh, slightly bitter flavor that balances the bread’s richness and gives a subtle contrast to the other ingredients.
Ultimately, the best olives for olive black bread depend on your personal taste preferences. You can mix and match different types for a more complex flavor, but the key is to select olives that will impart a savory, briny taste without overwhelming the bread’s other ingredients.
Ingredients You’ll Need for the Perfect Olive Black Bread
Flour
Flour is the foundational ingredient in any bread recipe, and olive black bread is no exception. The type of flour you use plays a crucial role in determining the texture, structure, and overall outcome of the loaf.
For olive black bread, all-purpose flour is a common choice because it strikes a good balance between elasticity and tenderness. This flour provides enough structure for the bread while still allowing it to remain soft and flavorful. All-purpose flour is versatile and readily available, making it ideal for home bakers looking to create a simple, delicious loaf.
If you’re aiming for a denser, heartier bread, whole wheat flour can be an excellent alternative or addition. Whole wheat flour retains more nutrients and adds a nutty flavor that complements the briny olives. However, it absorbs more liquid, so you may need to adjust the water amount to achieve the right dough consistency.
For a lighter, airier texture, some bakers may opt for bread flour, which has a higher protein content than all-purpose flour. This increased protein helps create a stronger gluten network, resulting in a chewier and more substantial loaf. While bread flour isn’t necessary for olive black bread, it can be used if you’re looking for a more traditional, chewy texture.
When baking olive black bread, you may also want to combine flours, such as using a mix of all-purpose and whole wheat flour, to strike the perfect balance of flavor, texture, and structure in the finished loaf.
Olives
Olives are the star ingredient in olive black bread, providing both flavor and texture to the loaf. These small, yet powerful fruits, are typically preserved in brine or oil, giving them a distinctive savory, tangy, and sometimes bitter taste. The variety of olives you choose can dramatically impact the final flavor profile of your bread.
Kalamata olives are a popular choice due to their deep, purple color and bold, rich flavor. They have a slightly fruity and briny taste that pairs well with the mildness of the dough, adding depth and complexity. Their firm texture also helps maintain their shape during baking, offering satisfying bites throughout the bread.
For a milder taste, Manzanilla olives are a great option. These small, green olives are slightly nutty with a subtle brine flavor. Their delicate profile doesn’t overpower the bread, making them ideal for those who prefer a more understated olive flavor.
Green olives like Arbequina bring a slightly more bitter flavor that contrasts nicely with the sweetness of the dough. Their smoother texture allows them to blend seamlessly into the bread, providing a balanced flavor without overwhelming the taste.
Black cured olives, such as Nyon olives, contribute a deeper, earthier taste that complements the rustic nature of olive black bread. These olives are often dried and cured, offering a more intense flavor that stands up well against the other ingredients.
When selecting olives for this bread, consider their flavor intensity and texture. Mixing different types of olives can create a more dynamic and complex loaf, highlighting the beauty of this Mediterranean-inspired bread.
Yeast
Yeast is essential for olive black bread. It causes the bread to rise and gives it a light, airy texture. This living organism ferments the dough, converting sugars into carbon dioxide, which makes the dough expand. Without yeast, your bread would remain dense and flat, lacking the soft, fluffy crumb that makes bread so enjoyable.
There are two main types of yeast typically used in bread-making: active dry yeast and instant yeast. Both types are suitable for olive black bread, though they work slightly differently. Active dry yeast must be dissolved in warm water before being added to the dough, whereas instant yeast can be mixed directly with the dry ingredients without the need for proofing. Instant yeast is often preferred for its convenience and faster rising time.
Yeast also contributes to the flavor of the bread. As it ferments, it develops complex flavors that complement the olives. The longer the dough rises, the more pronounced these flavors become. Some bread recipes even call for a slow fermentation process, allowing the yeast to work over several hours or overnight, which deepens the flavor of the bread.
It’s important to note that the temperature of your ingredients can impact the effectiveness of yeast. Water that’s too hot can kill the yeast, while water that’s too cold will not activate it properly. The ideal temperature for activating yeast is between 100°F and 110°F (37°C to 43°C). Properly activated yeast ensures your olive black bread will rise beautifully, resulting in a light, fluffy loaf with a rich, savory flavor.
Olive Oil
Olive oil is a key ingredient in olive black bread, contributing both flavor and texture to the loaf. Not only does it enhance the bread’s moistness, but it also infuses it with a rich, earthy flavor that complements the olives. The use of olive oil reflects the Mediterranean origins of the bread, where olive oil is a staple in both cooking and baking.
In this recipe, extra virgin olive oil is often the preferred choice. Extra virgin olive oil is the highest quality, made from the first cold press of olives, and has a fruity, slightly peppery taste. This oil imparts a deeper, more complex flavor to the bread compared to other types of oils. It also adds to the bread’s overall richness without overpowering the other ingredients, allowing the olives and yeast to shine.
The inclusion of olive oil also helps create a tender crumb. It coats the flour and prevents the dough from becoming too dry, ensuring a soft and moist loaf. Olive oil’s natural fats contribute to a smoother texture, providing a pleasant mouthfeel when eating the bread.
Additionally, olive oil plays a role in achieving a golden-brown, crispy crust. As the bread bakes, the oil helps the crust crisp up while maintaining a tender interior. Some bakers even brush the top of the loaf with olive oil before baking to enhance the color and add extra flavor.
Overall, olive oil is not just a cooking fat in this recipe; it’s a flavor-enhancing ingredient that elevates the olive black bread, making it both flavorful and beautifully textured.
Step-by-Step Guide to Baking Olive Black Bread
Mixing the Dough
Mixing the dough is crucial for developing the bread’s structure and texture. Proper mixing ensures the ingredients are well combined and the yeast activates, allowing the dough to rise properly.
Start by combining the flour, yeast, salt, and any dry ingredients in a large mixing bowl. Stir these ingredients together to ensure even distribution. Once the dry ingredients are mixed, slowly add warm water and olive oil to the mixture. The water should be between 100°F and 110°F (37°C to 43°C), as water that is too hot or too cold can prevent the yeast from activating properly.
As you add the liquid ingredients, use a wooden spoon or your hands to combine them with the dry ingredients. Once the dough begins to come together, you may need to knead it. Kneading is an important step that helps to develop the gluten in the flour, giving the bread its chewy texture. Knead the dough for about 8-10 minutes on a floured surface, until it becomes smooth and elastic. If the dough is too sticky, you can add a small amount of flour, but be careful not to overdo it, as too much flour can lead to a dense loaf.
After kneading, fold in the chopped olives, being careful not to break them up too much. The olives should be evenly distributed throughout the dough, adding pockets of flavor in each bite. Once the dough is mixed and the olives incorporated, it’s ready for its first rise, which will allow the yeast to work its magic and make the bread light and airy.
Kneading the Dough
Kneading the dough is vital for developing gluten, which gives the bread structure and a chewy texture. It also ensures the dough is smooth, elastic, and properly mixed, leading to a light, airy loaf.
Start by transferring the dough to a lightly floured surface. With clean hands, begin pressing the dough down with the heels of your palms. Then fold the dough over itself, turning it a quarter turn each time. Continue this motion of pressing, folding, and turning for about 8-10 minutes. As you knead, the dough should become less sticky and more smooth. If the dough is too sticky, you can sprinkle a small amount of flour, but be careful not to add too much, as it can result in a dry or dense loaf.
During kneading, you may notice the dough become more elastic and resistant to stretching. This is a sign that the gluten is developing, which is key to achieving the desired texture in your final loaf. The dough should also become smoother and softer to the touch, indicating that it is well-formed.
Incorporating chopped olives into the dough is another important aspect of kneading. Gently fold the olives into the dough once it reaches a smooth, elastic consistency. Be careful not to overwork the olives, as you want to maintain their shape and not break them up too much.
Once kneading is complete, form the dough into a ball and place it in a lightly oiled bowl, covered with a damp cloth. Allow it to rise and double in size, signaling that your dough is ready for the next step.
First Rise
The first rise is a critical stage in the bread-making process, allowing the dough to develop its texture and flavor. During this period, the yeast ferments the sugars in the flour, producing carbon dioxide gas, which causes the dough to expand and become airy.
After kneading the dough, shape it into a ball and place it in a large, lightly oiled bowl. The oil prevents the dough from sticking to the bowl as it rises. Cover the bowl with a damp kitchen towel or plastic wrap to retain moisture. The ideal temperature for the first rise is between 75°F and 80°F (24°C to 27°C), so place the bowl in a warm, draft-free area.
Let the dough rise for about 1 to 1.5 hours, or until it has doubled in size. During this time, the yeast is actively working, breaking down the sugars in the flour and producing carbon dioxide, which causes the dough to puff up. You may notice the dough expanding and becoming slightly lighter in texture.
It’s important not to rush this process. If the dough hasn’t risen enough, the bread will be denser and lack the soft, airy texture that makes olive black bread so enjoyable. Be patient, and allow the dough to rise fully before moving on to the next step.
Once the dough has doubled in size, gently punch it down to release any air bubbles that have formed, then shape it into the desired loaf shape. The dough is now ready for its second rise, where it will continue to develop flavor and texture before baking.
Shaping and Second Rise
After the first rise, it’s time to shape the dough and allow it to undergo the second rise, a crucial step that further develops the bread’s texture and flavor.
To begin shaping, gently punch down the dough to release the gas bubbles that have formed during the first rise. This helps prevent large air pockets from forming in the bread and ensures an even crumb. Turn the dough out onto a lightly floured surface, and with your hands, gently flatten it into a rectangular shape. Then, fold the edges inward and roll the dough tightly into a loaf shape, pinching the seam to seal it. The goal is to form a tight, uniform loaf that will hold its shape while baking.
Once shaped, transfer the dough to a greased loaf pan or a baking sheet, depending on the type of bread you prefer. The pan will help the dough maintain its shape, while a baking sheet will allow the loaf to spread slightly as it rises.
The second rise is essential for allowing the dough to become lighter and more airy. Cover the dough loosely with a damp cloth or plastic wrap and let it rest in a warm, draft-free place for another 30 to 60 minutes. During this time, the dough will rise again, expanding and becoming softer. It should double in size and feel slightly puffy when gently pressed.
This second rise ensures a light, fluffy texture in the final loaf. Once the dough has fully risen, it’s ready to be baked, and you can enjoy the delightful savory flavors of your homemade olive black bread.
Tips for Perfecting Your Olive Black Bread
Proper Kneading
Proper kneading is essential for achieving the ideal texture and structure in olive black bread. This step helps develop the gluten, which is responsible for the bread’s chewy and airy crumb. Kneading also ensures that all ingredients, including olives, are evenly distributed throughout the dough.
To begin kneading, turn the dough out onto a clean, lightly floured surface. Press the dough down with the heels of your hands, pushing it away from you. Then, fold the dough over itself and turn it a quarter turn. Repeat this process of pressing, folding, and turning for about 8-10 minutes.
As you knead, the dough will start to feel smoother and more elastic. Initially, it may seem sticky, but as the gluten develops, it will become easier to handle. If the dough is too sticky, sprinkle a small amount of flour on the surface, but be careful not to add too much flour, as this can result in a denser loaf. Kneading too little can leave the dough too loose and difficult to shape, so it’s important to knead thoroughly.
One key consideration when kneading olive black bread is incorporating the chopped olives. After the dough becomes smooth and elastic, gently fold in the olives. Do this carefully to avoid crushing them, ensuring they remain intact throughout the dough. Their rich flavor and texture will be evenly distributed throughout the bread.
Once properly kneaded, the dough should feel soft, smooth, and slightly tacky but not sticky. Proper kneading ensures a well-formed, airy loaf with a chewy texture and a burst of savory olive flavor in every bite.
Baking Temperature
Baking temperature is a critical factor in ensuring your olive black bread has the perfect texture, color, and flavor. The right temperature helps achieve a crispy, golden-brown crust while keeping the inside soft and airy. Typically, olive black bread is baked at a moderate to high temperature, usually between 375°F and 400°F (190°C to 200°C).
Preheat your oven fully before placing the bread inside to ensure even cooking. An oven that’s too cool can result in a dense, undercooked loaf, while one that’s too hot might burn the crust. Preheating ensures even heat distribution, allowing the bread to rise properly in the first few minutes.
The initial high heat is essential for creating a beautiful crust. As the dough hits the oven, the outer layer crisps up, while steam makes the crumb soft and airy. After 10 minutes, reduce the temperature to 350°F (175°C) to bake the bread through without over-browning the crust.
To check if your olive black bread is done, tap the bottom of the loaf; it should sound hollow. Alternatively, you can use a thermometer to ensure an internal temperature of about 200°F (93°C), which guarantees the bread is fully baked without being undercooked in the center.
Baking at the right temperature ensures your olive black bread has a golden, crispy exterior and a soft, flavorful interior, resulting in a perfect, savory loaf every time.
Olive Variety
The type of olives used in olive black bread can significantly influence the flavor and texture of the final loaf. Different olive varieties offer unique tastes, ranging from mild and tangy to bold and savory. Choosing the right olive variety is key to achieving a well-balanced, flavorful bread.
Kalamata olives, with their rich, slightly briny flavor and firm texture, are one of the most popular choices for olive bread. Their deep purple hue also adds a beautiful contrast to the bread’s soft, golden interior. These olives provide a robust, slightly fruity flavor that pairs wonderfully with the subtle taste of the dough.
Another excellent option is Manzanilla olives, known for their small size and light, briny taste. These olives offer a milder flavor profile, making them a great choice if you prefer a less intense olive presence in your bread. Their slightly nutty undertones can create a more delicate loaf.
For a more earthy and complex flavor, Nyon olives or Ligurian olives may be used. These varieties tend to have a richer, more savory flavor, perfect for those who want a deeper olive taste in their bread. Both types are typically preserved in oil and herbs, which can enhance the aroma of the bread.
Regardless of the variety chosen, it’s important to use pitted olives to avoid any unpleasant surprises while eating. Chopped or sliced olives distribute more evenly throughout the dough, ensuring a consistent flavor with each bite.
Experimenting with different olive varieties lets you create personalized flavor profiles, adding a Mediterranean twist to each loaf.
Storage
Proper storage is essential for maintaining the freshness and flavor of your olive black bread. Homemade bread lacks preservatives, so it’s important to store it properly to prevent it from becoming stale or drying out.
For short-term storage, you can keep the bread at room temperature for up to 3 days. The best way to store it is by wrapping it in a clean kitchen towel or placing it in a bread box. This helps maintain moisture balance while allowing airflow. This prevents the bread from becoming soggy while keeping the crust crisp.
If you need to store the bread for a longer period, freezing is the best option. Allow the bread to cool completely before wrapping it tightly in plastic wrap, aluminum foil, or a resealable freezer bag. This prevents freezer burn and preserves the bread’s texture. When you’re ready to enjoy it, let the bread thaw at room temperature. For a freshly baked crust, you can briefly warm the bread in the oven at 350°F (175°C) for 5-10 minutes to revive its texture.
For individual slices, you can freeze them separately. This allows you to pull out a slice whenever needed without thawing the entire loaf, ensuring that you always have fresh bread on hand.
By storing your olive black bread properly, you can enjoy its savory flavor and delightful texture for several days, or even longer if frozen.
Serving Suggestions for Olive Black Bread
With Cheese
Pairing olive black bread with cheese creates a blend of savory flavors and rich textures, perfect for any meal or snack. The tangy olives complement the creamy, sharp, or nutty qualities of various cheeses, enhancing the overall experience.
For a classic pairing, feta cheese works beautifully with olive black bread. The crumbly, salty nature of feta contrasts well with the soft, chewy texture of the bread. You can even use the bread as a base for an easy Mediterranean-inspired sandwich, adding fresh vegetables like cucumbers, tomatoes, and arugula for extra flavor.
Goat cheese is another fantastic option. Its smooth and slightly tangy flavor enhances the bread’s savory notes without overpowering them. Spread a generous layer of goat cheese on a slice of olive black bread, and enjoy the soft, creamy texture that balances the denser, chewy bread.
If you’re looking for something more indulgent, try pairing the bread with a rich, meltable cheese like brie or camembert. The creamy, buttery flavor of these cheeses contrasts wonderfully with the crispy crust of the bread, offering a luxurious bite.
For a more intense pairing, go for a sharp Parmesan or aged Manchego. These hard cheeses provide a bold contrast to the savory olive notes, creating a flavorful, satisfying combination. A drizzle of olive oil on top can add a final layer of richness.
Whether enjoyed as a simple snack or as part of a larger meal, pairing olive black bread with cheese offers endless possibilities for flavor exploration.
As a Side Dish
Olive black bread makes a versatile and flavorful side dish that can complement a wide variety of main courses. Its savory, slightly tangy flavor, enriched by the olives, pairs wonderfully with Mediterranean, Italian, and rustic dishes, adding depth and texture to your meal.
For a Mediterranean-inspired meal, serve slices of olive black bread alongside grilled lamb or roast chicken. The bread’s subtle saltiness and chewy texture balance well with the rich flavors of the meat. You can also pair it with a vibrant Greek salad, where the olives in the bread echo the olives in the salad, creating a cohesive and harmonious dish.
In an Italian-themed meal, olive black bread is a perfect accompaniment to pasta dishes like spaghetti with marinara sauce or pasta primavera. The hearty bread helps soak up extra sauce and adds a delicious contrast to the lightness of the pasta. It can also serve as a great side to bruschetta, with its crunchy exterior enhancing the freshness of tomatoes, basil, and garlic.
For a more rustic approach, serve the bread with soup or stews, such as tomato soup or beef stew. The bread can be used to dip into the rich, flavorful broth, providing a satisfying texture that complements the dish’s heartiness.
Olive black bread is also an excellent choice for a cheese board. Its bold flavors make it a perfect base for soft cheeses, such as goat cheese or brie, and it pairs beautifully with cured meats like prosciutto or salami.
With its versatility and depth of flavor, olive black bread elevates any meal, making it a delightful side dish for countless occasions.
For Sandwiches
Olive black bread is a fantastic choice for making flavorful, savory sandwiches. Its chewy texture and tangy, briny olive flavor make it a great base for various fillings, enhancing your sandwich experience.
One of the best ways to enjoy olive black bread in a sandwich is to pair it with grilled vegetables. The bread’s robust flavor complements the smokiness of grilled peppers, zucchini, and eggplant. Add a layer of hummus or pesto for a creamy, herby richness, and you have a satisfying vegetarian sandwich bursting with Mediterranean flavors.
For a heartier option, roast beef or turkey works beautifully on olive black bread. The bread’s savory notes enhance the rich, juicy meat, and the chewy texture holds up well against the slices of tender protein. A smear of mustard or aioli can add an extra kick, while lettuce and tomato bring a refreshing crunch.
If you’re craving something lighter, olive black bread pairs wonderfully with cheese. Try it with goat cheese, brie, or mozzarella for a creamy and indulgent sandwich. Add a few slices of cucumber or arugula for some freshness, and you have a delicious, no-cook option that’s perfect for a quick lunch or picnic.
You can also create an open-faced sandwich by topping the bread with a fried egg or smoked salmon and a sprinkle of fresh herbs. The combination of warm, savory bread with the richness of the egg or salmon makes for a delightful treat.
Whether you prefer cold sandwiches or something toasted, olive black bread adds a unique twist to your favorite fillings.
Toppings
Toppings enhance the flavors of olive black bread, letting you get creative with your combinations. The savory taste pairs beautifully with vegetables, cheeses, meats, and spreads, making it perfect for various toppings.
For a light and refreshing option, top the bread with avocado slices, a sprinkle of sea salt, and a drizzle of olive oil. This combination highlights the bread’s olive flavor while adding a creamy, satisfying texture. You can also add cherry tomatoes, arugula, and a dash of balsamic glaze for an extra burst of freshness.
For a heartier topping, try spreading cream cheese or goat cheese on the bread, and adding smoked salmon and capers. This classic topping is reminiscent of a bagel but with a Mediterranean twist. You could also top the bread with roast beef or turkey, adding mustard or mayonnaise for a savory, satisfying bite.
For those who love a bit of sweetness, you can top olive black bread with fig jam and blue cheese. The sweet jam and bold, tangy cheese create a flavor contrast that complements the bread’s earthy olives. Alternatively, honey and ricotta cheese make for a deliciously light, sweet topping that pairs wonderfully with the bread’s richness.
For a comforting option, top the bread with melted mozzarella or cheddar and add herbs like oregano or thyme for a pizza twist.
With these versatile topping ideas, olive black bread can transform into a savory or sweet treat for any occasion.
Conclusion
Creating olive black bread is a rewarding process that results in a delicious, savory loaf perfect for a variety of meals. To summarize the key steps:
- Mix the Dough: Start by combining flour, yeast, salt, and water. Stir until the mixture forms a sticky dough. Don’t forget to add olive oil for added richness and to help with texture.
- Knead the Dough: Once the dough is mixed, knead it on a floured surface until it becomes smooth and elastic. This helps develop the bread’s structure.
- First Rise: Let the dough rise in a warm place for about an hour or until it doubles in size. This step is crucial for light, airy bread.
- Shape and Second Rise: Shape the dough into a loaf and let it rise again, allowing it to rest and develop more flavor.
- Bake: Finally, bake your loaf at the right temperature to ensure a crispy crust and soft interior.
Follow these simple steps to create a loaf of olive black bread with perfectly balanced flavors and textures.
This recipe offers endless possibilities—enjoy it on its own, with cheese, in a sandwich, or with a hearty meal. The process is fun, and the result is worth every minute. Try it and discover the Mediterranean-inspired flavor it brings to your table.
1 thought on “Olive Black Bread Recipe: How to Create the Perfect Savory Loaf”