
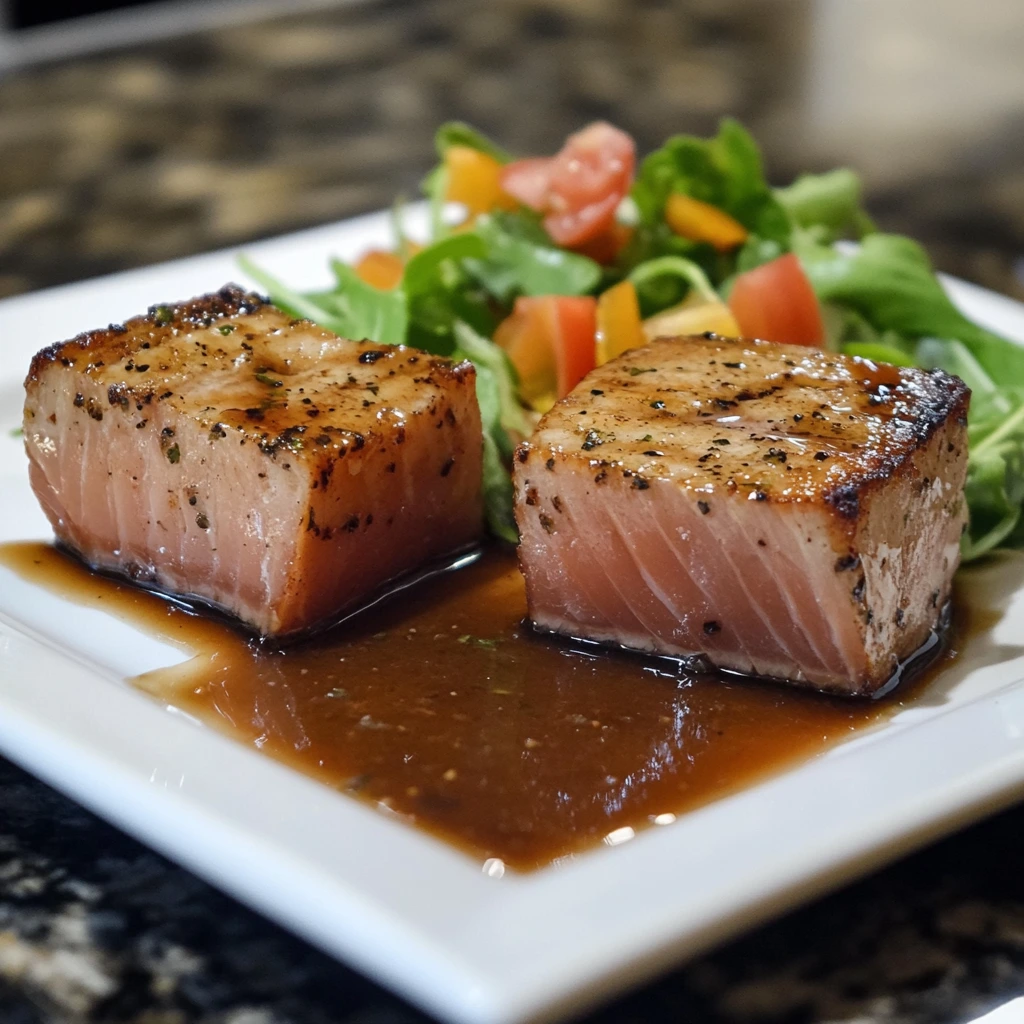
If you’re looking for a quick, flavorful, and restaurant-quality dish, this seared ahi tuna recipe is a must-try. With a perfectly crispy crust on the outside and a tender, melt-in-your-mouth center, seared ahi tuna is a favorite among seafood lovers. Whether you’re a seasoned home cook or trying it for the first time, this recipe is simple to follow and packed with bold flavors.
Ahi tuna, also known as yellowfin tuna, is prized for its firm texture and rich taste, making it perfect for searing. Cooking it over high heat for just a minute or two locks in the natural flavors while keeping the inside beautifully rare. Plus, it’s high in protein, loaded with omega-3s, and naturally low in carbs, making it a healthy option for any meal.
In this guide, we’ll walk you through everything you need to know to make the best seared ahi tuna, from choosing the right fish to perfecting the searing process. Get ready to impress your taste buds with this quick and easy recipe!
Table of Contents
What is Ahi Tuna and Why Searing Works Best?
What is Ahi Tuna?
Ahi tuna, also known as yellowfin tuna (Thunnus albacares), is a species of tuna prized for its firm texture, mild flavor, and deep red color. It is commonly used in sushi, sashimi, and seared preparations because of its ability to be served raw or lightly cooked. Ahi tuna is leaner than some other types of tuna, such as bluefin tuna, but still boasts a rich, buttery taste that pairs well with a variety of seasonings and marinades.
There are two primary types of ahi tuna:
- Yellowfin Tuna – The more common variety, known for its mild flavor and firm flesh. It’s widely available in grocery stores and fish markets.
- Bigeye Tuna – A fattier, richer version of ahi tuna, often considered more flavorful and commonly found in high-end sushi restaurants.
Why is Ahi Tuna Great for Searing?
Ahi tuna is one of the best fish for searing because its firm flesh holds up well to high heat. Unlike some delicate fish that flake apart when cooked, ahi tuna retains its shape, making it easy to handle. Additionally, because of its sushi-grade quality, it is safe to eat medium-rare or even raw when sourced from a reputable fishmonger.
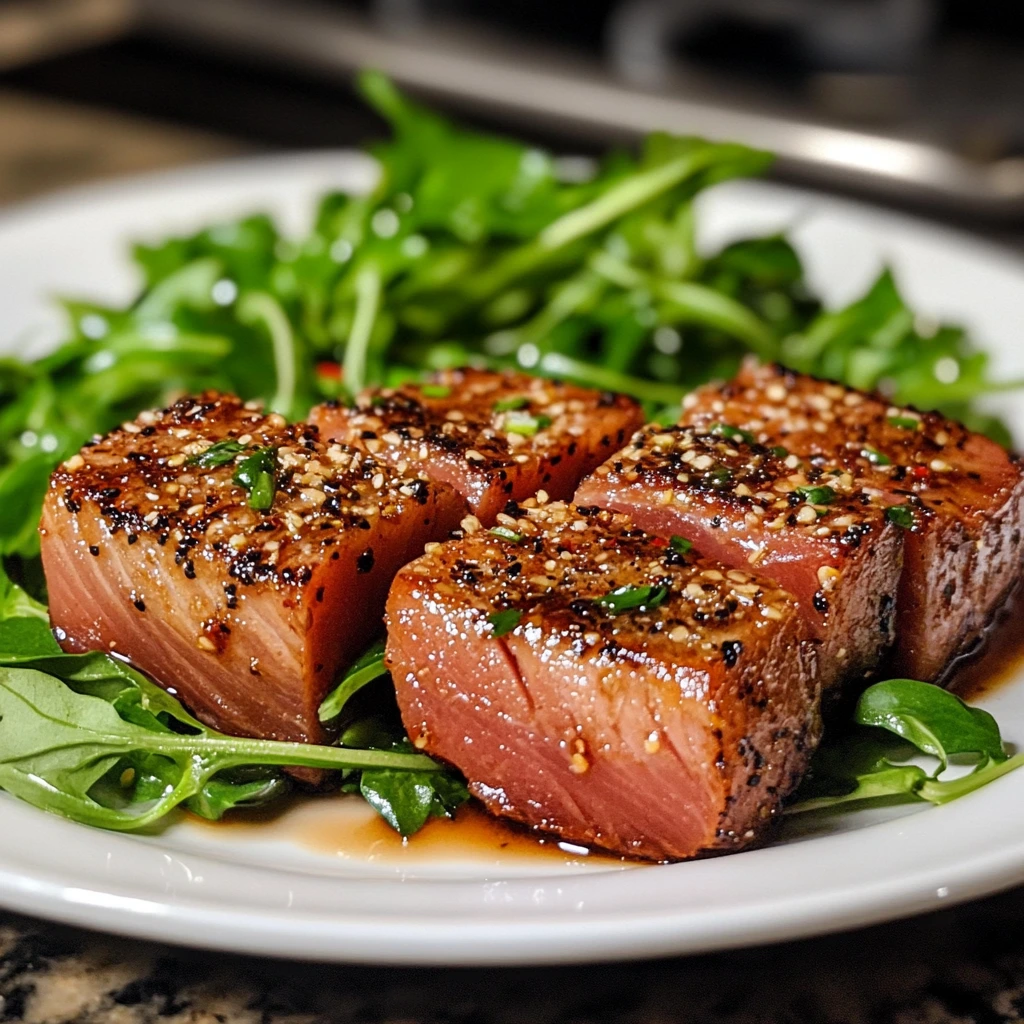
When seared, the outer layer forms a flavorful crust while the inside remains tender and juicy. This contrast in textures—crispy on the outside, buttery and rare on the inside—is what makes seared ahi tuna such a culinary favorite.
Why Use Sashimi-Grade Tuna?
When preparing seared ahi tuna, choosing sashimi-grade tuna is essential for both safety and quality. Unlike fully cooked fish, seared ahi tuna is only briefly exposed to high heat, leaving the inside rare or raw. Because of this, it’s crucial to select high-quality, fresh tuna that is safe for raw consumption.
What Does “Sashimi-Grade” Mean?
The term “sashimi-grade” is not an official FDA designation but rather a label used by fishmongers to indicate that the fish has been handled and processed with raw consumption in mind. This means the tuna has been flash-frozen at extremely low temperatures to kill any potential parasites, ensuring it meets food safety standards.
How to Choose the Best Sashimi-Grade Ahi Tuna
To get the best results for your seared ahi tuna recipe, look for the following characteristics:
- Color: High-quality ahi tuna should have a deep red or pink hue, indicating freshness. Avoid fish that looks brown or has a dull appearance.
- Texture: It should be firm and smooth, not mushy or slimy.
- Smell: Fresh tuna should have a mild, clean ocean scent. A strong, fishy odor is a sign that it’s past its prime.
- Labeling: Purchase from a trusted seafood market or grocery store that specifically labels the fish as sushi- or sashimi-grade.
Can You Use Non-Sashimi-Grade Tuna?
If you can’t find sashimi-grade tuna, it’s best to fully cook the fish instead of serving it rare. Otherwise, you risk foodborne illness. Always source from a reputable fishmonger to ensure the safest and most flavorful seared ahi tuna experience.
The Science of Searing
Searing is a culinary technique that enhances both the flavor and texture of ahi tuna by exposing its surface to high heat for a short period. This process creates a beautifully caramelized, golden-brown crust while keeping the inside tender and rare. But how does this work?
The Maillard Reaction: Creating Flavor and Texture
The key to searing is the Maillard reaction, a chemical process that occurs when proteins and sugars in the tuna interact under high heat (typically above 300°F (150°C)). This reaction is responsible for the rich, umami-packed crust that gives seared ahi tuna its signature taste.
For the Maillard reaction to work effectively, a few factors are crucial:
- High Heat: The pan must be extremely hot (preferably cast iron or stainless steel) before adding the tuna. This ensures quick searing without overcooking the interior.
- Dry Surface: Excess moisture on the tuna prevents browning. Patting the fish dry before cooking helps achieve a perfect crust.
- The Right Oil: High-smoke-point oils like avocado, sesame, or vegetable oil prevent burning and allow even cooking.
Why Only a Quick Sear?
Unlike meats, ahi tuna has very little connective tissue, meaning it doesn’t need long cooking times to become tender. Overcooking dries out the fish, making it tough and less flavorful. That’s why it’s best to sear each side for only 30–60 seconds—just enough to develop a crust while keeping the inside perfectly rare.
Mastering the science of searing ensures your ahi tuna is restaurant-quality, delivering a delicious contrast between the crisp exterior and buttery-soft interior.
Essential Ingredients for the Best Seared Ahi Tuna
Choosing the Right Tuna
Selecting the right tuna is crucial for achieving the best seared ahi tuna—both in terms of flavor and safety. Since seared ahi tuna is typically served rare or lightly cooked, choosing high-quality, fresh, and properly handled tuna is essential.
Best Types of Tuna for Searing
There are several types of tuna, but not all are ideal for searing. The best options include:
- Yellowfin Tuna (Ahi Tuna) – This is the most commonly used variety for searing. It has a mild, slightly sweet flavor with a firm texture that holds up well to high heat.
- Bigeye Tuna – Slightly fattier than yellowfin, bigeye tuna has a richer taste and a buttery mouthfeel, making it another excellent choice for searing.
- Bluefin Tuna – Considered a delicacy, bluefin tuna is the most flavorful and fatty, but it is also the most expensive and overfished. If available and sustainably sourced, it provides an incredibly luxurious seared tuna experience.
How to Identify Quality Tuna
To ensure you’re choosing the best tuna for searing, look for these signs of freshness:
- Color: Fresh ahi tuna should have a deep red to pink hue. Dull, brown, or discolored fish is a sign of oxidation and age.
- Texture: The fish should be firm and smooth, not soft, mushy, or slimy.
- Smell: It should have a mild, clean ocean scent, not a strong, fishy odor.
- Sashimi-Grade Labeling: Always purchase from a trusted fishmonger or store that specifically labels the tuna as sushi- or sashimi-grade, ensuring it’s safe to eat rare.
By selecting high-quality, fresh tuna, you’ll achieve the perfect restaurant-style seared ahi tuna every time.
Key Seasonings
Seared ahi tuna is delicious on its own, but the right seasonings and marinades enhance its flavor, creating a perfect balance of umami, spice, and zest. Since ahi tuna has a mild, slightly sweet taste, seasonings should complement rather than overpower the fish.
Essential Seasonings for Seared Ahi Tuna
- Salt & Pepper – A simple coarse sea salt and cracked black pepper seasoning enhances the tuna’s natural flavor and helps create a crisp crust.
- Sesame Seeds – A blend of black and white sesame seeds adds crunch, nuttiness, and an appealing visual contrast when seared.
- Garlic & Ginger – Freshly minced or powdered garlic and ginger bring warmth and depth, commonly used in Asian-inspired seared tuna recipes.
- Cayenne or Crushed Red Pepper – Adds a subtle heat that pairs well with the mildness of the tuna.
- Soy Sauce or Tamari – A savory, umami-rich base for marinades or dipping sauces. Tamari is a great gluten-free alternative.
Popular Marinades & Rubs
- Classic Soy-Ginger Marinade: A mix of soy sauce, grated ginger, garlic, sesame oil, and honey enhances the tuna’s umami profile.
- Spicy Sriracha Rub: A combination of sriracha, lime juice, and sesame oil adds bold heat and tang.
- Citrus-Herb Blend: A refreshing mix of lemon zest, lime juice, cilantro, and olive oil brightens the dish.
Final Touches
After searing, drizzle with a teriyaki glaze, ponzu sauce, or wasabi aioli for an extra layer of flavor. Whether you keep it simple or go bold, the right seasonings make your seared ahi tuna truly irresistible!
Best Oils for Searing
Choosing the right oil is crucial when searing ahi tuna. Since searing requires high heat to create a crispy, flavorful crust while keeping the inside rare, you need an oil with a high smoke point that won’t burn or overpower the tuna’s delicate flavor.
Top Oils for Searing Ahi Tuna
- Avocado Oil – With a smoke point of 520°F (271°C), avocado oil is one of the best options for high-heat cooking. It has a neutral taste, allowing the natural flavors of ahi tuna to shine.
- Grapeseed Oil – A light, neutral oil with a smoke point of around 420°F (216°C), grapeseed oil is a great choice for searing tuna without adding extra flavor.
- Sesame Oil (Toasted or Light) – Regular sesame oil (smoke point 410°F/210°C) works well for searing, while toasted sesame oil (smoke point 350°F/175°C) adds a deep, nutty flavor but should be used sparingly to avoid burning.
- Canola Oil – With a smoke point of 400°F (204°C), canola oil is an affordable and widely available option, though it has a slightly heavier feel.
- Peanut Oil – Often used in Asian cooking, peanut oil has a smoke point of 450°F (232°C) and a mild nutty flavor that pairs well with ahi tuna.
Oils to Avoid
Avoid oils with low smoke points, such as butter, extra virgin olive oil, or flaxseed oil, as they can burn quickly, leaving a bitter taste.
By selecting the right high-heat oil, you’ll achieve a beautifully seared ahi tuna with a crispy exterior and a tender, melt-in-your-mouth center.
Step-by-Step Guide to Perfectly Seared Ahi Tuna
Prepping the Tuna
Properly prepping the tuna is essential for achieving the perfect seared ahi tuna. The preparation process ensures the fish retains its freshness, flavor, and texture while allowing the seasonings to adhere properly. Here’s how to prep your ahi tuna for searing:
Step 1: Thawing (If Frozen)
If you’ve purchased frozen ahi tuna, it’s important to thaw it correctly before cooking. To avoid compromising the texture, place the tuna in the refrigerator overnight for a slow thaw. For a quicker method, submerge it in cold water (in a sealed plastic bag) for about an hour. Avoid using hot water, as this can partially cook the fish.
Step 2: Remove Skin and Bones
Most sashimi-grade ahi tuna should already be free of skin, but check for any remaining skin or bones. Gently run your fingers over the fish to feel for any small bones that might need to be removed using tweezers. Skin can be removed by making a small incision at one corner and gently pulling it off.
Step 3: Cut into Steaks
For searing, cut the tuna into steaks or thick slabs about 1 to 1.5 inches thick. This ensures that the fish can develop a crispy exterior while keeping the inside rare. Slicing the fish against the grain helps preserve its tenderness.
Step 4: Pat Dry
Before seasoning, pat the tuna dry with paper towels to remove any excess moisture. This helps the seasonings stick to the fish and promotes a better sear. A dry surface is key to creating a crispy, caramelized crust.
With these steps, you’ll ensure your ahi tuna is properly prepped, leading to a beautifully seared, flavorful result!
Choosing the Right Pan
The pan you use for searing ahi tuna can significantly affect the final result. A good pan ensures an even sear and helps achieve that perfect crispy crust while keeping the inside rare and tender. Here’s what to look for when selecting the right pan:
Best Pans for Searing Ahi Tuna
- Cast Iron Skillet – Cast iron is a top choice for searing tuna due to its excellent heat retention and ability to distribute heat evenly. It maintains a consistent high temperature, helping create a perfectly seared crust without overcooking the inside. A well-seasoned cast iron skillet also adds a subtle flavor.
- Stainless Steel Pan – Stainless steel pans are another great option, as they also provide excellent heat distribution. They create a strong sear and, when preheated properly, help achieve a beautiful golden-brown crust on the tuna.
- Non-stick Pan (with caution) – Non-stick pans can be used, but they’re not ideal for high-heat searing, as they may not develop the same level of crust. If using a non-stick pan, make sure it’s oven-safe and can handle higher temperatures.
Avoid These Pans
While a non-stick pan can work in a pinch, avoid using thin pans or those with uneven heat distribution, as they can result in an uneven sear. Additionally, woks or skillets with high sides can trap steam, preventing the tuna from developing a proper crust.
Preheating Your Pan
Whichever pan you choose, it’s crucial to preheat it thoroughly before adding the tuna. Aim for a high heat (around 400–450°F) to ensure the pan is hot enough to sear the fish quickly and evenly, preserving its tender interior.
The Perfect Sear
Achieving the perfect sear on ahi tuna is all about timing, temperature, and technique. A beautifully seared tuna steak has a crispy, golden-brown exterior while remaining rare and tender on the inside. Here’s how to master the art of searing ahi tuna:
Step 1: Preheat Your Pan
Start by heating your pan over medium-high to high heat for 3–5 minutes. Use a cast iron or stainless steel pan for the best results, as they retain and distribute heat evenly. The pan should be hot enough to sizzle when the tuna touches it, but not smoking.
Step 2: Season the Tuna
While the pan is heating, season your tuna with salt, pepper, and any other spices you prefer, such as sesame seeds or crushed red pepper. Ensure the tuna is dry before seasoning to help achieve a better sear. Patting the fish with paper towels removes excess moisture, which prevents steaming.
Step 3: Sear the Tuna
Once the pan is hot, add a high-smoke-point oil, such as avocado or grapeseed oil. Swirl the oil around to coat the bottom of the pan, then carefully place the tuna steaks in the pan. Sear each side for 30–60 seconds, depending on the thickness of the tuna and your desired doneness. The tuna should easily lift off the pan without sticking.
Step 4: Rest the Tuna
After searing, remove the tuna from the pan and let it rest for a minute to allow the juices to redistribute. This helps maintain its tenderness.
The result: a crispy exterior and a tender, rare interior, making for the perfect seared ahi tuna!
Resting and Slicing
After searing your ahi tuna, it’s essential to let it rest and then slice it properly to ensure the best flavor and texture. These final steps make a big difference in the overall experience of your dish.
Step 1: Resting the Tuna
Once your tuna steaks are seared to perfection, remove them from the pan and let them rest for 1–2 minutes. This brief resting period allows the juices inside the tuna to redistribute, preventing them from running out when you slice the fish. Resting also ensures that the tuna stays tender and moist without overcooking.
Step 2: Slicing the Tuna
Slicing ahi tuna properly is crucial for both presentation and texture. To maintain the fish’s tenderness, slice against the grain of the tuna. The grain is the pattern of muscle fibers that run through the fish, and cutting across them helps achieve a more delicate bite. Aim for thin, even slices, around ½ inch thick, to enhance both the flavor and texture.
Tip for Slicing
Use a sharp knife for the cleanest cuts. A dull knife can cause the tuna to shred or lose its smooth texture. For a more elegant presentation, you can arrange the slices on a plate in a fan shape or stack them for a sushi-like aesthetic.
By allowing the tuna to rest and slicing it with care, you’ll retain its flavorful juices and create a dish that is as visually appealing as it is delicious. Enjoy your perfectly seared tuna, and savor every tender bite!
Best Sauces and Side Dishes for Seared Ahi Tuna
Top Dipping Sauces
Dipping sauces can elevate your seared ahi tuna, adding extra layers of flavor and enhancing its natural taste. Whether you prefer something tangy, savory, or spicy, the right sauce can take your dish to the next level. Here are some top dipping sauces that pair perfectly with seared tuna:
1. Soy Sauce & Wasabi
A classic combination, soy sauce brings rich umami, while wasabi adds a bold, spicy kick. For a twist, mix in a bit of honey or rice vinegar to balance out the heat and saltiness, creating a well-rounded dipping sauce.
2. Ponzu Sauce
Ponzu is a citrus-based soy sauce that brings a delightful tangy flavor to seared tuna. The lemon or lime juice in ponzu brightens up the richness of the fish and pairs beautifully with its natural sweetness. For extra flair, garnish with chopped green onions or grated ginger.
3. Spicy Mayo
For a creamy and spicy dip, spicy mayo is an excellent choice. Mix mayonnaise with a small amount of sriracha sauce and a dash of lime juice for a creamy, flavorful sauce that has a spicy punch. You can adjust the heat by varying the amount of sriracha.
4. Teriyaki Sauce
Sweet and savory, teriyaki sauce adds a rich glaze to seared tuna. It’s perfect for those who enjoy a bit of sweetness paired with the fish’s natural flavors. You can easily make your own by combining soy sauce, honey, garlic, and ginger.
5. Ginger-Lime Sauce
A refreshing, light option, ginger-lime sauce uses fresh ginger, lime juice, soy sauce, and sesame oil for a tangy, zesty dip that complements the tuna’s mild flavor.
These dipping sauces bring out the best in your seared ahi tuna, allowing you to customize the experience to your taste preferences.
Side Dish Pairings
The right side dishes can complement the flavors and texture of seared ahi tuna, balancing its rich, delicate taste with a variety of textures and flavors. Whether you prefer something fresh, light, or savory, here are some excellent side dish pairings that will elevate your meal:
1. Asian-Inspired Slaw
A light and crunchy Asian-inspired slaw made with cabbage, carrots, and a tangy sesame dressing is a perfect contrast to the rich, tender tuna. The crunch of the vegetables adds texture, while the sesame oil and vinegar dressing provides a delightful, zesty bite.
2. Steamed Asparagus
Steamed asparagus offers a simple yet elegant side dish that pairs wonderfully with seared ahi tuna. The crisp-tender asparagus provides a mild, slightly grassy flavor that balances out the richness of the tuna. Drizzle with a bit of lemon juice and a sprinkle of sea salt to enhance the dish.
3. Coconut Rice
For a slightly sweet and creamy side, try pairing seared tuna with coconut rice. The coconut milk adds richness and a subtle sweetness that complements the savory fish without overpowering it. This tropical side also works well with dipping sauces like ponzu or spicy mayo.
4. Roasted Vegetables
A mix of roasted root vegetables, such as carrots, sweet potatoes, and parsnips, provides a warm, hearty side that contrasts the cool, fresh tuna. The caramelization from roasting brings out the natural sweetness of the vegetables, balancing the tuna’s natural flavors.
5. Avocado Salad
For a fresh and creamy option, serve seared tuna with a simple avocado salad. A combination of ripe avocado, cucumber, and cherry tomatoes, dressed with lime and cilantro, provides a refreshing contrast to the richness of the tuna.
These side dishes offer a variety of textures and flavors that perfectly complement the seared ahi tuna, creating a well-rounded and satisfying meal.
Wine & Drink Pairings
The right drink can enhance the flavors of your seared ahi tuna, balancing its richness and complementing its delicate texture. Whether you prefer wine, beer, or a cocktail, the ideal pairing can elevate your dining experience. Here are some of the best wine and drink pairings for seared ahi tuna:
1. White Wine – Sauvignon Blanc
A crisp, refreshing Sauvignon Blanc is an excellent wine pairing for seared ahi tuna. Its high acidity and citrus notes provide a perfect balance to the rich, fatty fish, while its freshness complements the tuna’s delicate flavor. A chilled bottle of Sauvignon Blanc will cleanse your palate between bites.
2. Rose Wine
A light and dry rosé offers a fruity and crisp profile that works beautifully with seared tuna. The subtle red fruit flavors enhance the fish without overpowering it. Its bright acidity helps cut through the richness of the tuna, making it an excellent companion for a flavorful meal.
3. Light Beer – Pilsner or Lager
For beer lovers, a pilsner or lager pairs wonderfully with seared ahi tuna. These beers are light and crisp, with a clean finish that doesn’t overshadow the tuna’s flavors. A pilsner’s light bitterness and lager’s mild maltiness create a balanced contrast to the fish’s tender texture.
4. Sparkling Wine – Prosecco
If you’re looking for something festive, a Prosecco or another dry sparkling wine is a great choice. The bubbly texture and citrusy finish refresh your palate while complementing the tuna’s fresh, clean flavors. It’s also perfect for any special occasion or gathering.
5. Iced Green Tea or Lemonade
For non-alcoholic options, iced green tea offers a refreshing, slightly bitter flavor that pairs well with tuna, while lemonade provides a citrusy, sweet contrast that complements the fish and any accompanying sauces.
These wine and drink pairings add a thoughtful touch to your seared ahi tuna meal, enhancing every bite with complementary flavors.
Pro Tips for Making the Best Seared Ahi Tuna Every Time
How to Get the Perfect Crust
Achieving the perfect crust on seared ahi tuna is all about the right balance of heat, timing, and technique. A crust that is golden-brown and crispy adds both texture and flavor, elevating your tuna to the next level. Here’s how to master the art of getting the perfect crust:
1. High Heat is Key
To create a crisp, caramelized crust, you need to start with a hot pan. Preheat your pan on medium-high to high heat for 3–5 minutes before adding your tuna. A cast iron or stainless steel skillet works best because they retain and distribute heat evenly. The pan should be hot enough that when the tuna hits it, you hear a sizzle.
2. Pat the Tuna Dry
Before searing, it’s crucial to pat your tuna dry with a paper towel. Excess moisture will create steam in the pan, preventing the tuna from developing a crispy crust. The drier the surface, the better the crust.
3. Use the Right Oil
Choose an oil with a high smoke point like avocado oil, grapeseed oil, or canola oil. These oils can handle the high heat required for searing without burning, ensuring the tuna gets a nice, golden crust without any bitter flavors. Lightly coat the bottom of the pan with oil, ensuring even coverage.
4. Don’t Overcrowd the Pan
To achieve a uniform crust, avoid overcrowding the pan. Sear the tuna in batches if necessary. This ensures each steak has plenty of room to form a perfect crust without steaming.
5. Sear Quickly
Sear each side of the tuna for about 30-60 seconds. The goal is a quick, high-heat sear to form the crust, while leaving the interior rare and tender.
With these techniques, you’ll be able to achieve the perfect crust every time!
How Long to Sear for Different Doneness Levels
The ideal searing time for ahi tuna depends on your desired doneness level. Whether you prefer your tuna rare, medium-rare, or well-done, adjusting the cooking time is key to achieving the perfect result. Here’s a guide to help you master the timing:
1. Rare (Seared on the Outside, Raw on the Inside)
For a rare sear, you want a very quick cooking time to preserve the tuna’s raw interior. Sear each side for 30 seconds to 1 minute. This ensures the outside is beautifully seared while the inside remains cool and raw. A rare tuna steak should have a crispy crust on the outside but be almost completely raw in the center.
2. Medium-Rare (Seared on the Outside, Cool and Pink Inside)
If you prefer your tuna to be medium-rare, sear each side for 1 to 2 minutes. The outside should be golden and crispy, while the inside will be cool and pink. This is the most popular level of doneness for ahi tuna, as it retains the fish’s rich flavor and buttery texture without being overly cooked.
3. Medium (Slightly Pink in the Center)
For a medium sear, sear each side for 2 to 3 minutes. The center will be more opaque and just slightly pink, while the outside will still have a nice, crispy texture. This level of doneness is for those who want a bit more firmness without completely losing the fish’s delicate texture.
4. Well-Done (Fully Cooked Through)
If you prefer well-done tuna, sear each side for 4 minutes or longer. The center will no longer be pink, and the texture will be firmer. While this isn’t traditional for ahi tuna, it can still be delicious if you enjoy a fully cooked fish.
By adjusting your searing time, you can achieve the perfect doneness level for your taste preferences.
Storing and Reheating Leftovers
If you find yourself with leftover seared ahi tuna, proper storage and reheating are essential to maintaining its quality and flavor. Here’s how to store and reheat your leftovers to keep them fresh:
1. Storing Leftovers
To store leftover seared tuna, cool it down quickly by letting it sit at room temperature for no more than 2 hours. Once it has cooled, wrap the tuna tightly in plastic wrap or place it in an airtight container. Refrigerate immediately. Ahi tuna can be safely stored in the fridge for 1–2 days. For longer storage, consider freezing it, although the texture may change upon thawing.
2. Freezing Leftovers
If you have a significant amount of leftover tuna, freezing is an option. Wrap the tuna in plastic wrap and then place it in a resealable plastic bag or freezer-safe container. This will help prevent freezer burn. Ahi tuna can be frozen for up to 2 months. When ready to eat, thaw it in the refrigerator overnight for the best results.
3. Reheating Leftovers
To preserve the delicate texture of your seared tuna, reheating should be done gently. The best method is to reheat on the stovetop over low heat. Place the tuna in a pan with a small amount of oil and cover it with a lid to retain moisture. Heat for 1–2 minutes per side, just long enough to warm it through without overcooking it. Alternatively, you can microwave tuna for about 20–30 seconds on low power, but this can slightly alter the texture.
By following these steps, you can keep your leftover seared ahi tuna fresh and delicious for your next meal!
Conclusion
Making the perfect seared ahi tuna is both a simple and rewarding process. With just a few key techniques, you can create a delicious, restaurant-quality dish right at home. Here are the key takeaways:
1. Quick and Easy Preparation
Searing ahi tuna is a fast process, typically requiring only a few minutes per side. With the right pan, oil, and seasoning, you can have a flavorful dish ready in under 10 minutes, making it perfect for a weeknight dinner or a quick lunch.
2. Use Sashimi-Grade Tuna
To ensure the best flavor and texture, always use sashimi-grade tuna. This ensures that the fish is fresh and safe to eat raw, which is crucial for a dish like seared ahi tuna that features a rare interior.
3. High Heat for the Perfect Crust
Achieving the perfect crust is all about using high heat and a good-quality oil with a high smoke point. A hot pan gives the tuna that golden, crispy exterior while keeping the inside tender and rare.
4. Customize with Seasonings and Sauces
The seasonings and sauces you choose can elevate the dish. Whether you prefer a simple seasoning of salt and pepper or a flavorful crust with sesame seeds, customize it to your taste. Top it off with a tangy dipping sauce or a splash of lemon for added zest.
5. Pair with Tasty Sides and Drinks
Pairing your seared ahi tuna with refreshing side dishes, like an Asian slaw or coconut rice, and the right drink, like a crisp Sauvignon Blanc, will complement the tuna and complete your meal.
Seared ahi tuna is quick, easy, and packed with flavor—making it a go-to dish for any occasion!
2 thoughts on “Perfectly Seared Ahi Tuna Recipe: A Step-by-Step Guide”